

Introduction
There are various tricks and hints we all use to make our daily system administration routines easier. One of them is virtual machine cloning provided by VMware vCenter Server. Great and simple thing allowing you to deploy many identical virtual machines to a group – no need to repeat the same process all over again. This is usually done in vCenter but there are several other ways you can go if it becomes unavailable.
Today, I’ll discuss three workarounds allowing you to clone VMs when running unmanaged ESXi:
- VMware vSphere Web Client
- SSH
- VMware PowerCLI
You can view this scribbling as a thing about not only cloning VMs without vCenter but also as a principle in the wide sense. In fact, all operations you usually carry out in your environment via GUI can be performed with either the vSphere Web Client or PowerShell commands. Just think through them and learn the right commands if needed. Nothing more than that!
Let’s break the cloning process without vCenter in detail
Before I go deeper, I want you to understand the stages that cloning process consists of. I believe this to be essential for understanding what’s exactly going on in my article.
The gist of cloning a source VM in case something happened to your vCenter is creating a target VM with just the same resources assigned to it as the source VM has. Next, the source *.vmdk and *.vmx files or disks are copied to the target’s folder. Eventually, the virtual disks are assigned to the target VM, and the clone gets registered and booted up.
Hey, where are the snapshots? VMware does not recommend cloning VMs with snapshots. So, either consolidate them or get rid of them.
VMware vSphere Web Client
Thanks to the familiar GUI, this is the easiest way to copy VM if VMware vCenter is unavailable. You’ll need just a web browser and several clicks to have the job done.
First, type your credentials and access the VMware ESXi server:

Navigate to the Virtual Machines menu and select the VM you need to clone. In my case, there is only one VM (VM-Main), running on the host so I’ll clone it:

Now, learn more about the VM properties. In particular, find out where the source VM disk is located. In my case, it is kept on Datastore-f:

Next, click Datastore browser to find the disk itself:

Create a new directory on the datastore:

Copy *.vmdk and *.vmx files from the source VM directory. Once files are copied, register the VM:
You can check whether copying is over in Recent Tasks (the task must have the Completed successfully status). Please note that cloning always takes some time. Even if you clone the VM within the datastore, you should better have a break as that process may take a while. How long will it take? Well, it depends on your hardware and virtual disk volume. PLEASE, NEVER REGISTER THE VM AND DON’T START IT UNTIL THE DISK IS COPIED, OTHERWISE YOU WON’T BE ABLE TO START IT!

Afterward, go to Edit Setting and check whether the recently copied *.vmdk is assigned to the target VM:

Well, that’s it! Settings say that the target VM uses the right *.vmdk file, so the source VM has been cloned:

Eventually, rename the target VM before starting. For that purpose, go to Actions and press the appropriate button:

Now, the cloned VM is ready to go. Click Power on to boot it:

SSH
By default, SSH is disabled on an ESXi host. In order to enable it, navigate via a web browser to the Services tab, select SSH, and press the Start button:

Below, I’ve provided several screenshots of the deployed commands. I do not want the entire thing to appear kinda of a black box, so I briefly explain what each command actually does. The numbers in the text refer the number of the step in the screenshots.
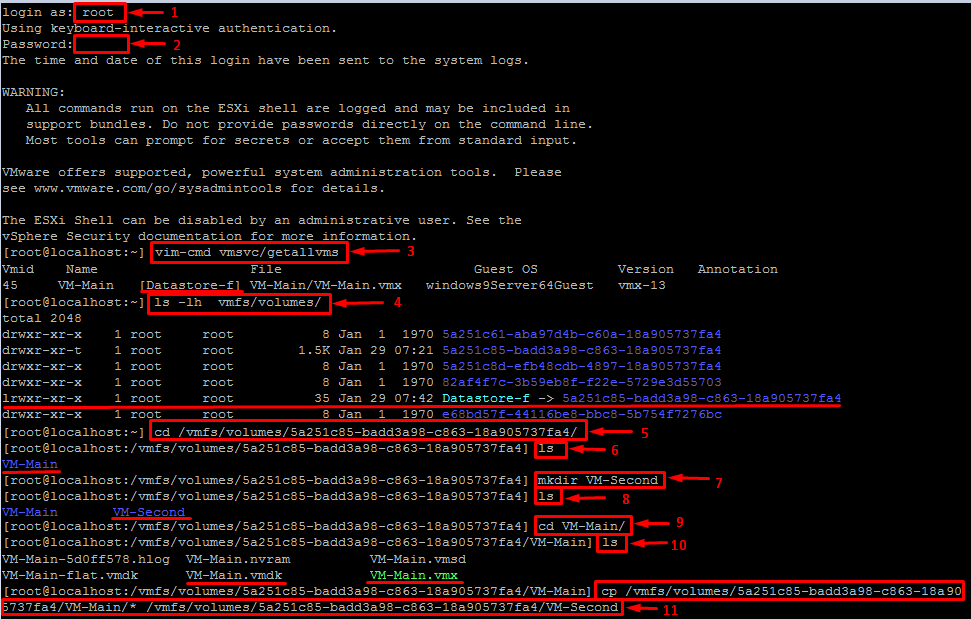
Just like in the previous part, you need to access the host using the root credentials first:
- Login: root
- Password: xx
Next, execute the following commands:
- To get the list of all registered VMs, execute vim-cmd vmsvc/getallvms. In my case, there is only VM-Main listed.
- To obtain the list of datastores, execute ls -lh vmfs/volumes. In my case, there will be only one datastore listed: Datastore-f.
- Now, let’s move to another directory. Type the cd command for that purpose. Here, I navigate to the Datastore-f directory.
- Type ls. This command provides you with the directory content. Here, the content of Datastore-f.
- To create a new folder with the specified name, enter mkdir <name folder>. Now, I use this command to create a directory where VM files will be copied.
- Execute ls again. This time, it serves for verifying a new directory creation.
- Next, use cd to move into to the recently created VM directory.
- Afterward, execute the ls command to check the VM directory content.
- Copy files from the source directory (VM-Main) to the target one (VM-Second) with the cp command.
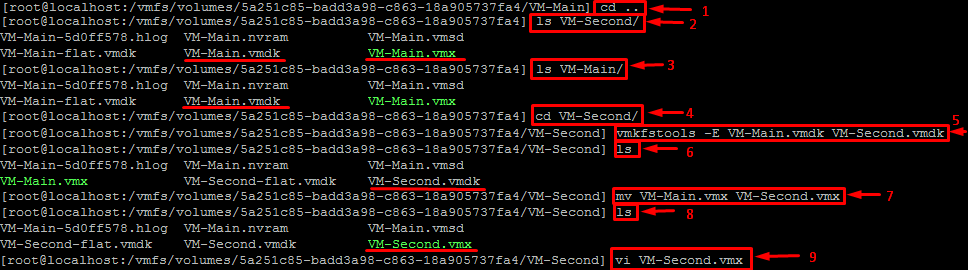
After executing the cp command, the console won’t respond for a while. Just wait a bit until the command works out.
Next, run the following set of commands:
- Type cd .. to navigate to the upper directory.
- Next, deploy the ls VM-Second command to acquire the VM-Second directory content.
- ls VM-Main, in its turn, provides the VM-Main content.
- Now, navigate to the source VM-Second directory with the cd VM-Second command.
- vmkfstools -E VM-Main.vmdk VM-Second.vmdk. This command allows renaming the *.vmdk file.
- Then, check whether the renaming worked out with the ls
- Afterward, type mv VM-Main.vmx VM-Second.vmx to rename the *.vmx file.
- Again, execute ls to check if the *.vmx file was renamed.
- vi VM-Second.vmx enables to modify the specified *.vmx file.
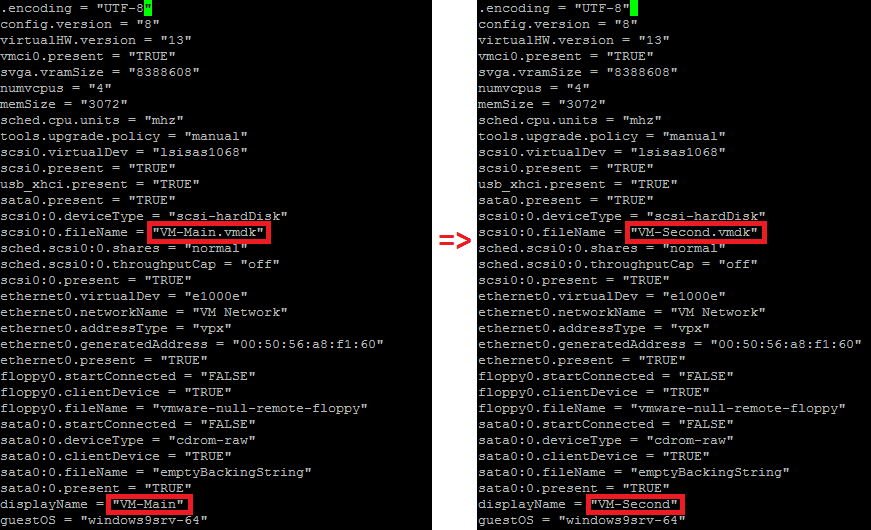
Once the last command is executed, change the fileName and displayName parameters as it is shown in the screenshot below. Once you modify parameters, save the changes. Find out more about working with vi here: https://kb.vmware.com/s/article/1020302
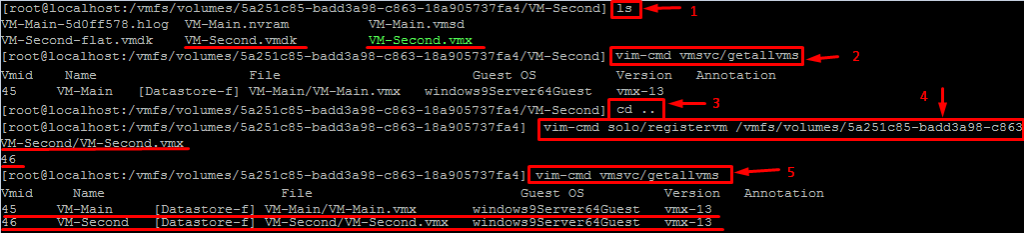
Once these parameters are changed, check out whether the VM has been copied properly and register the VM:
Type ls to check the directory content. Here, the VM-Second content.
execute vim-cmd vmsvc/getallvms to get the list of the registered virtual machines.
Execute cd .. to go up a directory level.
Register the VM with the vim-cmd solo/registervm /vmfs/volumes/5a251c85-badd3a98-c863/VM-Second/VM-Second.vmx command.
Enter vim-cmd vmsvc/getallvms to acquire the list of registered VMs. I’ve executed this command to check whether VM-Second has been registered properly.
You can also get the web-interface and check that the VM has been registered:

VMware PowerCLI
PowerCLI is a perfect tool for ones who want to automate the cloning jobs.
First, install VMware PowerCLI. If you encounter the issue with wrong certificate, here’s how you can fix it: https://www.ivobeerens.nl/2018/07/18/quick-tip-powercli-invalid-server-certificate-error/?utm_source=feedburner&utm_medium=feed&utm_campaign=Feed%3A+VirtualIef+%28Virtual+Ief%29. Then, save the script I provide below as the Clone-vm.ps1 file, and run it via PowerShell as administrator.
That’s how to start the script:
|
1 |
.\Clone-VM.ps1 -EsxiHostName 10.0.0.10 -EsxiUser “Esxi User Name” -EsxiPassword “Esxi Host Password” -VMName “Start VM Name” –VMNewName “VM Clone Name” |
![]()
Note that I the script copies VM files to the temporary directory on the PC from which you run it. Note that the VM should be powered off and it should not have snapshots. The time needed for copying virtual disks depends on their disk volume and the network bandwidth between ESXi host and VM. Note that the script provided below can clone the VM only within the datastore! Datastore name is detected automatically.
Now, let’s take a look at the script.
|
1 2 3 4 5 6 7 8 9 10 11 12 13 14 15 16 17 18 19 20 21 22 23 24 25 26 27 28 29 30 31 32 33 34 35 36 37 38 39 40 41 42 43 44 45 46 47 48 49 50 51 52 53 54 55 56 57 58 59 60 61 62 63 64 65 66 67 68 69 70 71 72 73 74 75 76 77 78 79 80 81 82 83 84 85 86 87 88 89 90 91 92 93 94 95 96 97 98 99 100 101 102 103 104 105 106 107 108 109 110 111 112 113 114 115 116 117 118 119 120 121 122 123 124 125 126 127 128 129 |
<# .SYNOPSIS Cloning a virtual machine on an esxi host using PowerCLI .PARAMETER EsxiHostName The name of the ESXi Host this VM that will be cloned .PARAMETER VMName The name of the VM that is cloned .PARAMETER VMNewName The name of the new VM .PARAMETER EsxiUser The name of the ESXi Host User .PARAMETER EsxiPassword The password for ESXi Host User .EXAMPLE PS> .\Clone-VM.ps1 -EsxiHostName 10.0.0.10 -EsxiUser "Esxi User Name" -EsxiPassword "Esxi Host Password" -VMName "VM Name" -VMNewName "VM Clone Name" #> param ( [Parameter(Mandatory = $true)] [String]$EsxiHostName, [Parameter(Mandatory = $true)] [String]$EsxiUser, [Parameter(Mandatory = $true)] [String]$EsxiPassword, [Parameter(Mandatory = $true)] [String]$VMName, [Parameter(Mandatory = $true)] [String]$VMNewName ) ## Connect to the ESXihost Connect-VIServer -Verbose:$true -Server $EsxiHostName -User $EsxiUser -Password $EsxiPassword ## Check if the VM that you are going to clone is registered if ((Get-VM -Name $VMName) -like $VMName) { Write-Host "Your VM ($VMName) is registered on this host!" } else { Cls Write-Host "VM ($VMName) does not exist or is not registered on this host($EsxiHostName)! Please register the VM ($VMName), then run the script!" pause Cls exit } ## Check whether the VM is enabled if((get-vm -name $VMName).PowerState -eq "PoweredOn" -or (get-vm -name $VMName).Guest.State -eq "Running") { Cls Write-Host "Please correctly stop the VM ($VMName) before cloning, then start the script!" pause Cls exit } else { Write-Host "Your VM ($VMName) is in a power off state!" } ## Check if the VM has snapshots if((Get-Snapshot -VM $VMName).Name.Length -cgt "0") { Cls Write-Host "The script is completed due to the presence of snapshots of this VM ($VMName)! Please start the script after removing all snapshots for this VM ($VMName)!" pause Cls exit } else { Write-Host "Snapshots of this VM ($VMName) do not exist!" } ## Get the variable values for paths to the VM $DatastoreBrowserPath = Get-Datastore | Select-Object DatastoreBrowserPath $VMDatastoreId = (Get-VM -Name $VMName).DatastoreIdList $VMDatastoreName = (Get-Datastore -id $VMDatastoreId).Name $VMDatastoreBrowserPath = (Get-Datastore -id $VMDatastoreId).DatastoreBrowserPath ## Derive the values for the paths variable to the VM directories $VMSourceFolder = $VMDatastoreBrowserPath+"\"+ $VMName+"\" $VMDestinationFolder = $VMDatastoreBrowserPath+ "\"+ $VMNewName+"\" $TmpPcFolder = Split-Path $script:MyInvocation.MyCommand.Path $TempPcFolder = $TmpPcFolder+"\"+$VMNewName+"\" $ListOfSourceFolder=(Get-ChildItem -Recurse -Filter '*.vmx*' -Exclude '*.vmdk','*.vmsd' -Path $VMSourceFolder) ## Copy VM configuration files to the temp directory on PC to change the parameters ForEach ($_ in $ListOfSourceFolder) { Copy-DatastoreItem $_ -Recurse -Force -Confirm:$false -Verbose:$true -Destination ($TempPcFolder+$_.Name.Replace($VMName,$VMNewName)) } ## Change the configuration settings ForEach ($_ in (Get-ChildItem -Path $TempPcFolder*)) { (Get-Content -Force -Path $_ -Raw) | %{($_).Replace($VMName,$VMNewName)} | Set-Content -Verbose:$true -Force $_ } ## Copy the configuration files to the directory of the new VM to the host datastore $ListOfPcTempFolder=(Get-ChildItem -Recurse -Filter '*.vmx*' -Exclude '*.vmdk','*.vmsd' -Path $TempPcFolder) ForEach ($_ in $ListOfPcTempFolder) { Copy-DatastoreItem $_ -Recurse -Force -Confirm:$false -Verbose:$true -Destination $VMDestinationFolder } ## Delete the temp directory on the PC Remove-Item -Recurse -Force -Confirm:$false -Verbose:$true $TempPcFolder ## Copy VM VMDK disks to the directory of another VM on the host datastore $VMVMDKList=(Get-HardDisk -VM $VMName).Name ForEach ($_ in $VMVMDKList) { $VMDK=(Get-HardDisk -vm $VMName -Name $_); Copy-HardDisk -Force -Confirm:$false -Verbose:$true -HardDisk ($VMDK) -DestinationPath (($VMDK).Filename.Replace($VMName,$VMNewName)) } ## Copy the rest of the VM files to the host datastore $ListOfAllSourceFolder=(Get-ChildItem -Recurse -Include '*.nvram','*.vmsd','*.log' -Path $VMSourceFolder) ForEach ($_ in $ListOfAllSourceFolder) { Copy-DatastoreItem $_ -Recurse -Force -Confirm:$false -Verbose:$true -Destination($VMDestinationFolder+$_.Name.Replace($VMName,$VMNewName)) } ## Register the cloned VM in the ESXi inventory New-VM -Confirm:$false -Verbose:$true -Name $VMNewName -VMHost $EsxiHostName -VMFilePath "[$VMDatastoreName] $VMNewName/$VMNewName.vmx" ## Start the clonedVM Start-VM -Verbose:$true -VM $VMNewName -ErrorAction SilentlyContinue Get-VMQuestion -Verbose:$true -VM $VMNewName | Set-VMQuestion -DefaultOption -Confirm:$false ## Disconnect the ESXi Host Disconnect-VIServer -Verbose:$true -Confirm:$false -Server $EsxiHostName |
That’s it, the VM has been cloned successfully:

Conclusion
Here, I’ve discussed three ways to clone a VM without having vCenter involved. It comes in handy when vCenter is unavailable for some reason. The workarounds shown here for sure are not that convenient as cloning the VM with VMware vCenter. Using the vSphere Web Client is probably the simplest way among these three options. However, both SSH and PowerCLI do the job, plus, you now have the script to automate cloning jobs. Hope, the things I wrote here come in handy!
