

Introduction
I think that any business needs a disaster recovery site. That’s why I discuss today VMware vCenter Site Recover Manager (SRM) 8.1 and how to set up that solution.
vCenter Site Recovery Manager in a nutshell
VMware vCenter Site Recovery Manager has been introduced back in 2011. It is a VMware vCenter plug-in for disaster recovery site configuration and management. It also allows migrating to that site at the moment of need or during planned migrations. In other words, SRM ensures shortest services downtime if something goes wrong at your main site. Please, don’t count on that thing that much since there will be insignificant time losses anyway.
This solution utilizes VMware vSphere Replication mechanism to automate VM migration to a disaster recovery site.
SRM implements 3 approaches towards VM replication:
- Datastore Groups – VM datastore group array-based replication.
- Individual VMs – replicating VMs on host basis. SRM functionality can also be combined with vSphere Replication.
- Storage Policies – policy-driven VM array-based replication.
- SRM allows 2 following mechanisms for site replication:
- Disaster recovery – this mechanism is enabled when your main site goes down all of a sudden. You just switch to your secondary site. Note that the temporary data may be lost.
- Planned migration – both main and secondary sites should be running. Data won’t be lost.
I hope the image below describes disaster recovery process good enough.

You can trigger the replica either manually (whenever you need) or automatically (after the primary site failure). The downtime should be as little as zero, but DON’T EXPECT IT TO BE ABSOLUTELY ZEROED OUT!
To have a disaster recovery plan deployed right, you need to set up these 3 components:
- vSphere Replication Appliance – the solution for VM asynchronous replication. It is distributed as OVF template. You need to deploy and set up the solution on both sites.
- Site Recovery Manager – software providing full control over replication. It is deployed on each vSphere site.
- Storage Replication Adapter – software to ensure Site Recovery Manager interaction with storage arrays. It is supplied as a hardware-vendor-specific driver.
Now, let’s take a closer look at installation and configuration of all those components.
vSphere Replication Appliance configuration
You can install vSphere Replication Appliance from the image. Note that you need to register first at the official VMware website. Today, I won’t bother you with boring installation process. I’d rather shed light only on the key moments.
1. Deploy the OVF template. For that purpose, you need to mount the ISO image that contains that file.

Apart from the OVF template, ISO contains a bunch of other files. Keep in mind that you need only *.ovf and *.vmdk files.

2. Next, enter VM name and select the destination host and directory.

3. Set the password and enter NTP server IP afterward. Be careful with NTP server address to avoid any troubles with security certificates in future while connecting the host to vCenter Server. If IPs are distributed automatically, you are done with OVF deployment. Otherwise, you need to do some network configuration work.

4. Power on the VM now and connect to it. Find out its IP and port number used for connecting it to the console.
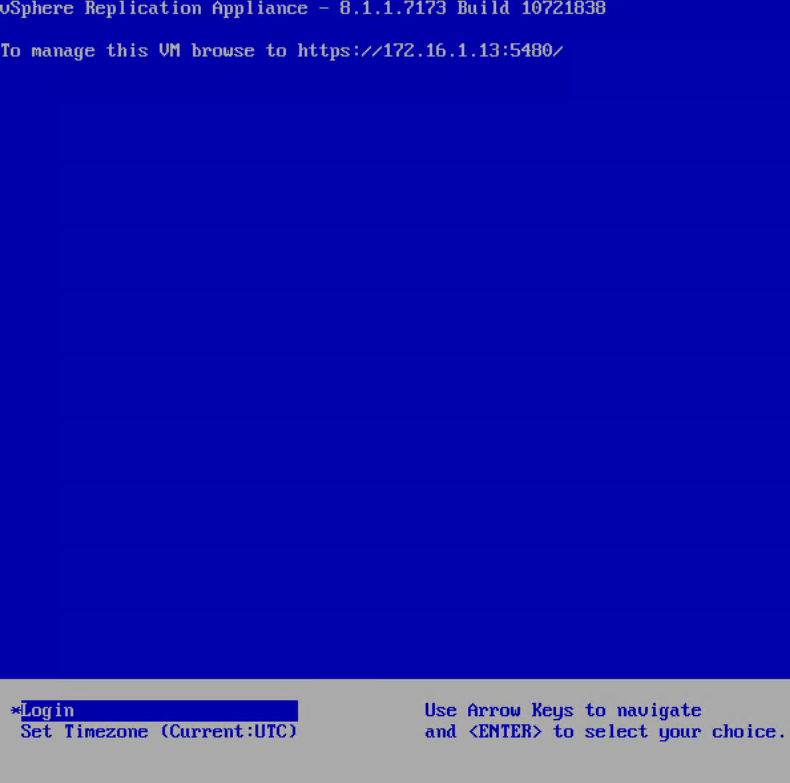
5. Open the web browser and log into vSphere Replication appliance console using the credentials you entered during the *.ovf file deployment.

6. Enter the credentials to connect vSphere Replication Appliance to vCenter Server.

7. Then, confirm the SSL certificate by pressing Accept. You should better always add a certificate signed by trusted authority. I used one that was generated by default.

8. Connect to vCenter Server HTML console. For that purpose, navigate to Home -> Site Recovery and click OPEN Site Recovery.

Now, let’s move to Site Recovery configuration.
Setting up Site Recovery Manager
1. Download the image first.
To install it, you need a Windows Server 2016 VM. You should better use that VM only for SRM installation since any other software may mess up Site Recovery Manager performance fairly easy. Next, save the VM disk locally and you are good to start installing that agent.
2. Installation wizard provides you with the link on documentation which you can read while installing SRM. Please, don’t ignore that link. Take your time and read that document carefully in order to avoid any possible inconveniences.

3. For better vCenter Site Recovery Manager performance, you should use a +20 GB eager zeroed thick virtual disk. Today I used a 40 GB device.
The software consumes 1.8 GB of disk space at the beginning, but it will take more disk capacity.

4. Enter Platform Service Controller address.

5. Accept the certificate afterward.

6. Select vCenter Server address located on this Platform Services Controller. In my case, there was only one IP.

7. Specify the site address (by default, it matches vCenter Server one) and administrator e-mail. Also, you should add vCenter Server host address.

8. Enter the SRM Plug-in ID required for a recovery pair creation. Here, I use a default one, but you can also enter a custom ID too.

9. Choose a server certificate type for Site Recovery Manager afterward.

10. Select a database server. Today, I use an embedded one.

11. Specify the new database credentials.

If you want to run the Service on any other account, you can specify its credentials.

12. Go to vCenter Server HTML console and verify the Site Recovery Manager instance availability.

If everything is ok, you are done with SRM configuration. Let’s configure Storage Replication Adapter (SRA) now.
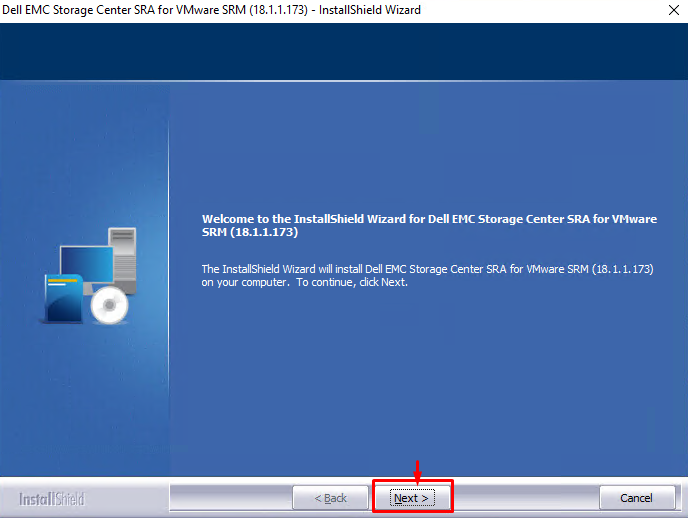
Configuring Storage Replication Adapter
Storage Replication Adapter is a storage driver that ensures SMR and Storage Virtual Machine interaction. SRA version is hardware-vendor specific (I use Dell PowerEdge R720 today). Find some documentation on adapters here.
To install SRA, enter the VM with the recently installed SRM. Extract the archive and initiate the installation process.
Installation process is pretty straightforward. Just move through all installation wizard steps!
After installation you can review driver description. It contains some prerequisites to ensure SRA smooth operation, so it is nice to look through it.

Conclusion
I guess that it is pretty much it for SRM deployment. Today, I did all boring job, and now I can move to recovery site creation. I discuss how this can be done in this article: https://www.vmwareblog.org/deep-dive-vmware-vcenter-site-recovery-manager-8-1-part-2-creating-disaster-recovery-site.
