
Introduction
Recently at my job, I was faced with a task to develop a file server explicitly suited for the requirements of the company. Needless to say, any configuration of a kind depends on what the infrastructure needs. So, drawing from my personal experience and numerous materials on the web, I came up with the combination FreeBSD+SAMBA+AD as the most appropriate. This combination is a harmonic addition to the existing network configuration since and enables admins with a broad range of possibilities for access control in Windows-based infrastructures. Also, Samba allows you to apply its network resources for Windows client OSs without any additional configurations required. Moreover, FreeBSD is well-documented.
Now, since we’ve established that, let’s move on to the next point. This article’s describing a possible model of the process of building a new test environment while concentrating primarily on the details of the configuration. Do mind, though, I must say I’m in no way suggesting that this is the only way! The following configuration will be presented in its initial stage, with the minimum requirements necessary to get the job done, and its purpose in one specific situation only. Here, look at this as a useful strategy to solve similar tasks. Well, let’s get started!
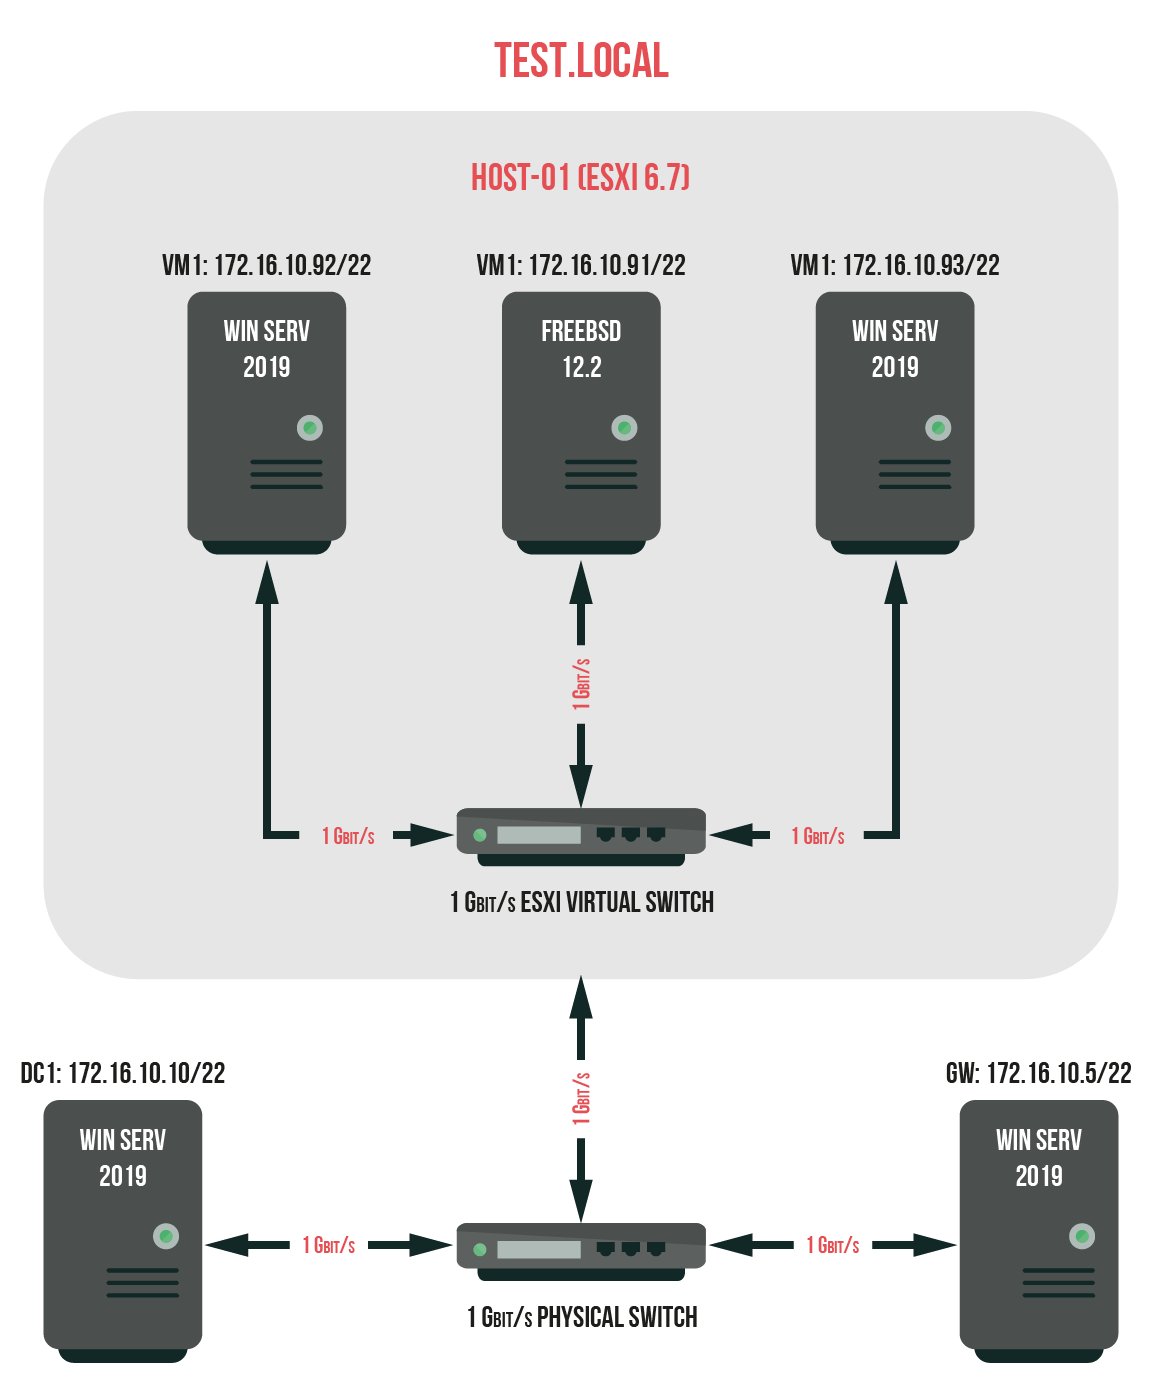
As you can probably guess from the previous commentaries, the creation of such a server doesn’t require much since FreeBSD isn’t resource-hungry at all. For reducing its hardware footprint, I have created it in a VM on the ESXi 6.7 up2 host. As a datastore, 1TB WD Black (Western Digital) hard disk drive has served my needs perfectly. We’ll place there two HDD (VM OS and storage). These are the parameters for the VM:
- 2 x Intel(R) Xeon(R) CPU E5-2660 @ 2.20GHz;
- 1 x 4 GB RAM;
- 2 x 1 TB HDD (RAW disk);
- 1 x SCSI controller (Type: LSI Logic SAS);
- 1 x CD/DVD drive;
- 1 x 1 Gb/s LAN (Type: VMXNET 3).
As this configuration suggests, we’ll spend two Western Digital Black HDD, 1TB each, but not because the size or vendor matters much. Now, both these HDDs will be connected to the VM as RAW disks. Let’s place the VM OS and storage on the first disk, and the second one will serve as a mirror to create virtual ZFS RAID. Connect the disks with the SCSI controller (Type: LSI Logic SAS). I came up with this configuration because it helps to cut the expenses, and the data on that network resource is not important. Furthermore, in my opinion, ZFS RAID is supposed to keep the data secure either way. Also, if you want to, you can use outside software for backup as well, but it’s another story for another day.
Time to get to work!

So, since we’ve covered everything to be covered, time to build a test environment according to the following scheme.
What to do:
- Connect HDD to the ESXi host, then create a datastore, and create a VM on this datastore;
- Install the FreeBSD on the VM;
- Install and configure the necessary services and utilities;
- Introduce the server to the domain;
- Create a network resource;
- Check the connection and work with the resource from more than one VM under different credentials.
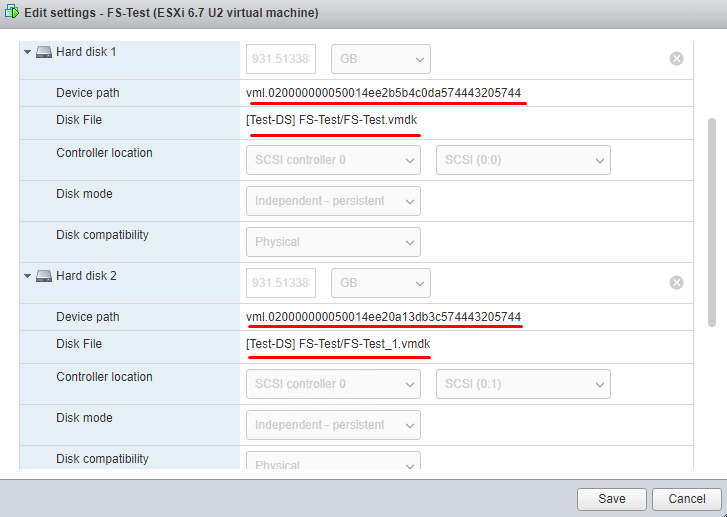
Create a VM on the ESXi host. Find out how to do that here. You have questions about what RAW disks do or how to get yourself one? Here, look it up. Keep in mind that before you start creating your RAW disks, you should delete the default disk since you won’t need it anymore. You can store the VM configuration files and disk names in the datastore where you have created the VM. That’s just in case you need them, to keep it at hand. Speaking from experience – this should enhance your file server speed because the VM will use your datastore single-handedly.
As the next step, download an image file for installing OS (FreeBSD 12.1) (the latest distributive) to the ESXi datastore. Now, add it as an image for CD/DVD drive in Datastore ISO File mode to the newly created VM. You can find out how to do that here.

This is important. For the further access and configuration to be successful, make sure that the VM has internet access. If not, it’ll cause trouble with updates.
Now, it’s installation time.
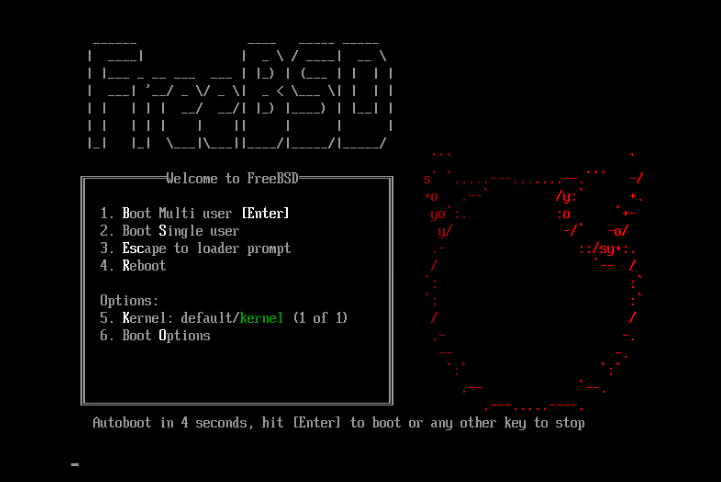
Since there’s a lot of materials on the installation of FreeBSD, we really have no point in giving it too much attention. Let’s just narrow it down to some crucial moments. Boot the VM and proceed with the installation.
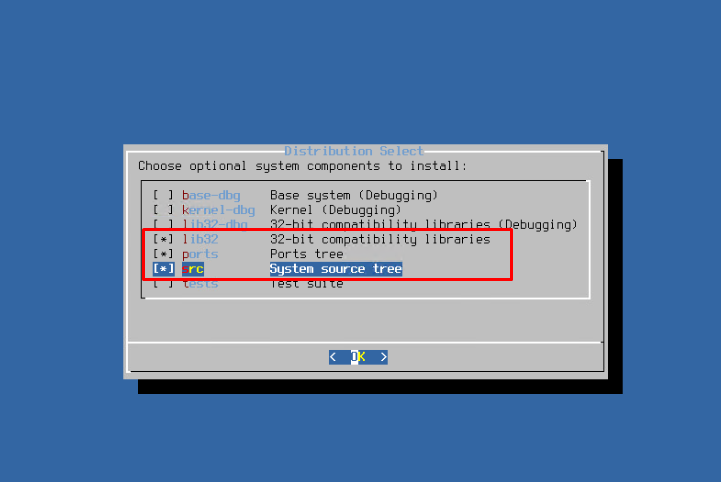
A few introductory words. When you are choosing optional system components, stick to the minimum (lib32, ports, src). You can add the rest later if there is a need.
Network configuration! You have to make sure the server works correctly, so let’s assign it a static IP address. It’s important to assign a static IP specifically: you want this server available at all times, which is, frankly, not something dynamic IP address can guarantee. DHCP term can end at the worst time ever, and you’ll just lose connection to this network resource. If you want to change an address of an already configured server with FreeBSD – find out how to do it properly.
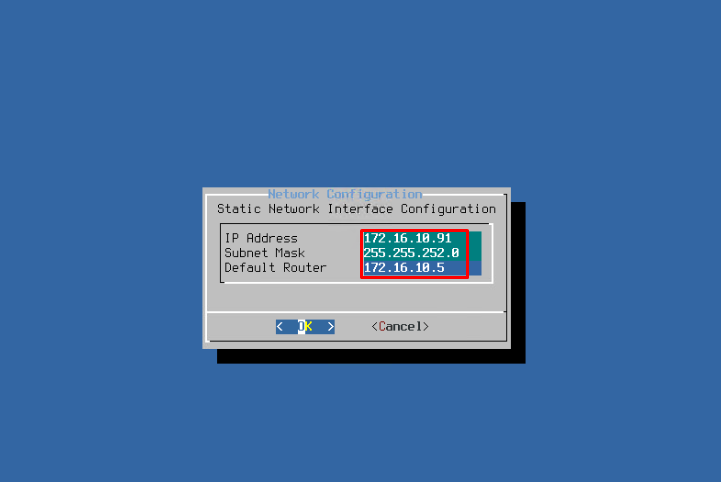
Decline the IPv6 configuration. We don’t need that one because you won’t need to use IPv6 in a local network. Select DNS servers addresses.
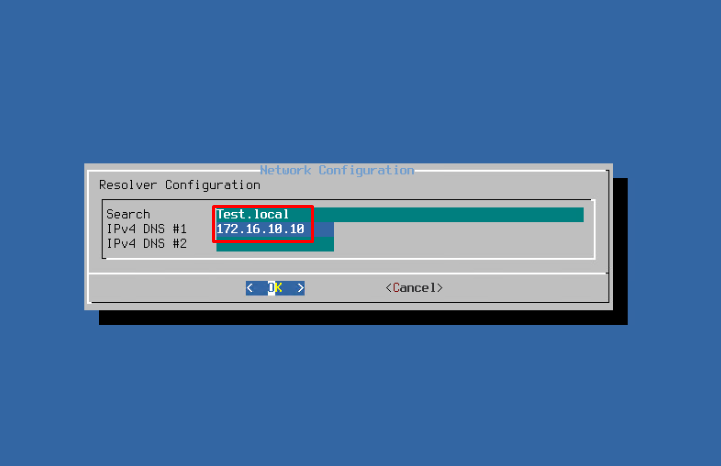
In case DNS doesn’t have settings to access the outside world, you’ll have to write a public DNS address: 8.8.8.8, or 8.8.4.4, as a second DNS. Google Servers will always come to your aid in such a case. Also, don’t forget about a working gateway with internet access.
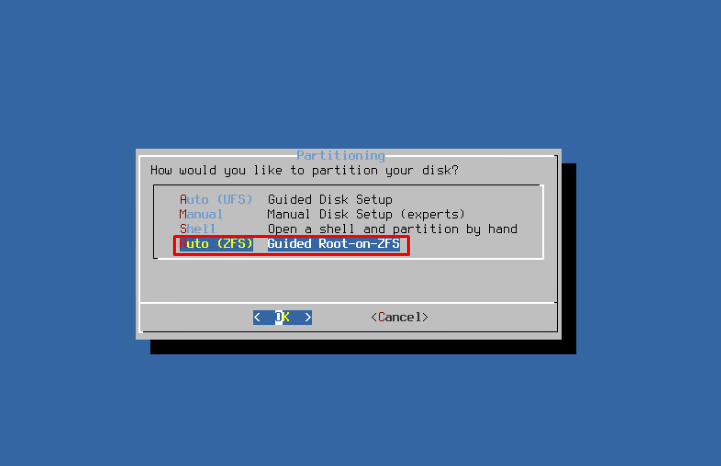
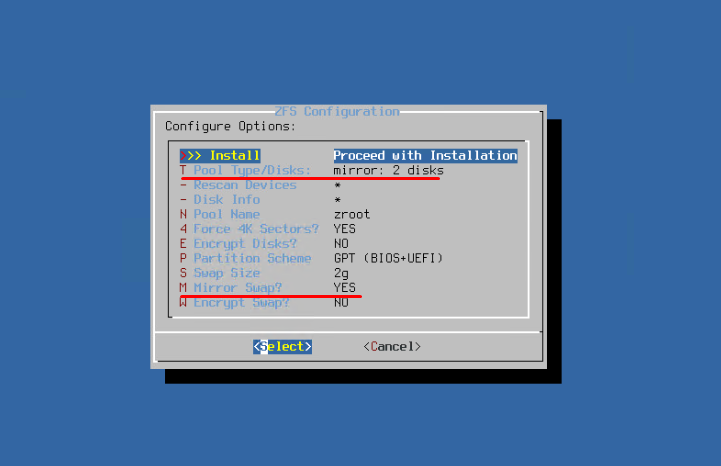
Now, your next move is disk partition for installation on ZFS. For one, I used Auto mode for quick and effective partition, letting the OS decide what is what. Of course, if you have tons of time to spend on the Internet search, you can do it all manually. However, I must assure you that for your purposes, Auto mode is more than enough.
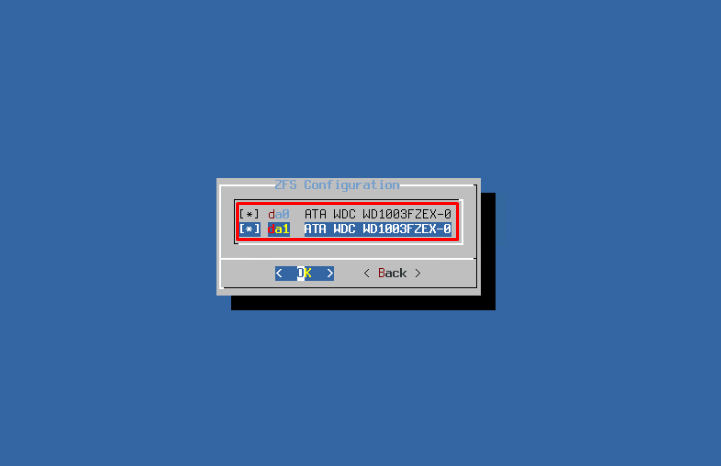
As I have mentioned before, for fault tolerance purposes, create a ZFS mirror.
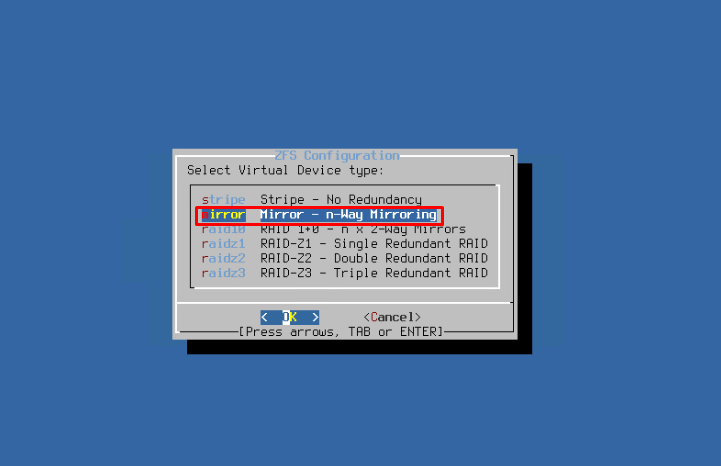
Select two physical devices to add to the mirror.
Turn on mirroring of the Swap partition to increase its reliability.
In general, these are all the details you should look out for. The rest, if necessary, is here. Don’t forget, however, to disconnect the ISO file from your VM. Better do it as soon as you can. Details are here. Finally, we can move on to the configuration of the server itself.
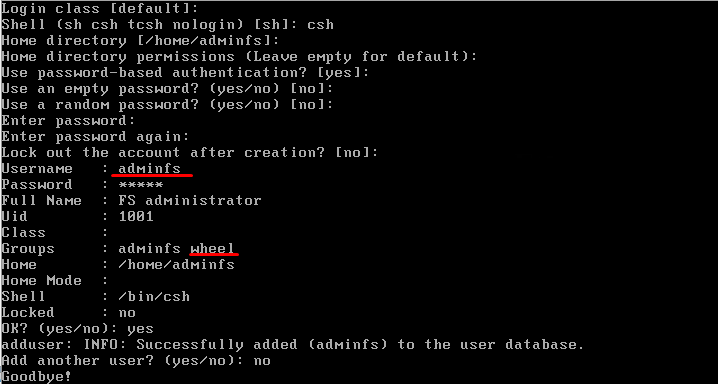
Now, for security purposes, create an account with the root access rights. Use the adduser utility (you can find more information about this utility here). Fill in the necessary fields and create a user with the adminfs username; add it to the wheel group. Otherwise, you wouldn’t be able to increase rights to root level. You can also complete this task during the OS installation process. All you should do is add another user using the OS setup wizard interface. For further comfortable use of the created resources, it would help if you have created an identical account with the same credentials in the AD and added it to the admin group. This is necessary for the further communication with the AD!
To verify whether this account is working, run reboot to reboot the server and log in as a new user. Since this new account will be added to the wheel group, you won’t have any problems upgrading the user to root; that is necessary for configuring system settings because that’s how you protect yourself from network security threats and rash actions during root configuration in multi-user mode.
To make your work more comfortable, you will manage and configure this server via SSH with the putty utility. Now, connect to the server remotely. You won’t be able to log in as a root user from the network side by default, so you’ll have to log into the system as a new user (adminfs). However, since further, you’ll need the root rights, upgrade the user privileges to root (you’ll need root credentials) using the su -l command. The rights will remain active unless you reboot or log out with the exit command.
Let’s install and configure some additional components that’ll make it easy to create and administer this server.
Here we begin with the ports updating. As I have already told you, upgrade your privileges to the root level with su command and the root password. Furthermore, with the portsnap fetch and portsnap extract commands (only for a fresh and recently installed OS) update your ports. Use the portsnap fetch and portsnap update commands for the following use.
Let’s install Midnight Commander (mc). If you don’t know what it is, well, it’s probably one of the best file managers there are. It can impress you with its broad range of useful options and utilities. If you have mc already installed or aren’t going to use it for various reasons, just skip this stage. You can install mc from the binary packets with no trouble at all by running this command: pkg install mc.
Install and configure Kerberos to work with AD:
- pkg install heimdal;
- move to /etc and create krb5.conf file; run the following commands (better to do it from mc):
|
1 2 3 4 5 6 7 8 9 10 11 12 13 14 15 16 17 18 19 20 21 22 23 24 25 26 27 28 29 30 31 32 33 34 35 |
[libdefaults] default_realm = TEST.LOCAL dns_lookup_realm = True dns_lookup_kdc = True ticket_lifetime = 24h renew_lifetime = 7d forwardable = Yes proxiable = True renewable = True clockskew = 300 [realms] TEST.LOCAL = { kdc = 172.16.10.10 admin_server = 172.16.10.10 default_domain = TEST.LOCAL } [domain_realms] .test.local = TEST.LOCAL |
TEST.LOCAL is a domain name, 172.16.10.10 is an address of a domain controller, so you should replace them. The names should be written in the high register because this helps you to avoid any problems during configuration.
Edit the file of Name Service Manager settings – /etc/nsswitch.conf. Do remember, you will need extended privileges for that action. If you want to find out more, you can do it here. Verify the values of the following lines, fix them accordingly in your file, and save the changes:
|
1 2 3 |
group: files winbind passwd: files winbind. |
Now, time to proceed with the installation and configuration of Samba itself:
- pkg install samba410 (the latest version is samba410, so let’s take this one);
- Edit the /etc/rc.conf file, so that during the OS boot it will start all services necessary for to Samba to work. Add the following lines in the file:
|
1 2 3 4 5 6 7 8 9 |
inetd_enable="YES" nmbd_enable="YES" smbd_enable="YES" winbindd_enable="YES" samba_server_enable="YES" |
You can find more about these lines (man inetd, man samba, etc);
- Move to directory: /usr/local/etc/ and create the smb4.conf file with the following content:
|
1 2 3 4 5 6 7 8 9 10 11 12 13 14 15 16 17 18 19 20 21 22 23 24 25 26 27 28 29 30 31 32 33 34 35 36 37 38 39 40 41 42 43 44 45 46 47 48 49 50 51 52 53 54 55 56 57 58 59 60 61 62 63 64 65 66 67 68 69 70 71 72 73 74 75 76 77 78 79 80 81 82 83 84 85 86 87 88 89 90 91 92 93 94 95 96 97 98 99 100 101 102 103 104 105 106 107 108 109 110 111 112 113 114 115 116 117 118 119 120 121 122 123 124 125 126 127 128 129 130 131 132 133 134 135 136 137 |
[global] workgroup = TEST security = DOMAIN realm = TEST.LOCAL netbios name = FS-Test server string = Samba Server Version %v map to guest = Never client lanman auth = No client plaintext auth = No domain master = No local master = No server min protocol = SMB2_10 server max protocol = SMB3 client min protocol = SMB2_10 client max protocol = SMB3 preferred master = No client signing = Mandatory dns proxy = No ldap ssl = No use sendfile = No client use spnego = Yes client ntlmv2 auth = Yes encrypt passwords = Yes restrict anonymous = 2 usershare allow guests = No usershare owner only = No socket options = TCP_NODELAY IPTOS_LOWDELAY idmap config * : backend = tdb idmap config * : range = 100000-299999 idmap config TEST : backend = rid idmap config TEST : range = 10000-99999 winbind enum users = Yes winbind enum groups = Yes winbind use default domain = Yes winbind nested groups = Yes winbind refresh tickets = Yes template homedir = /home/%D/%U template shell = /bin/false log file = /var/log/samba4/log.%m max log size = 2048 log level = 2 map hidden = No map system = No map archive = No map readonly = No map acl inherit = Yes store dos attributes = Yes acl group control = Yes case sensitive = No nt acl support = Yes ea support = Yes [zfs] comment = ZFS shared Directory path = /zroot/shared_fs write list = @TEST.LOCAL\Domain Admins, @TEST.LOCAL\Domain Users admin users = @TEST.LOCAL\Domain Admins force group = Domain Users read only = No create mode = 0660 directory mode = 0660 create mask = 0660 directory mask = 0660 available = Yes browseable = Yes public = No guest ok = No vfs objects = zfsacl, streams_xattr, acl_xattr nfs4:mode = Special nfs4:acedup = Merge nfs4:chown = Yes |
TEST.LOCAL and TEST are the names of a domain and a work group respectively, FS-Test is a server name, and ZFS is the name of a created resource. You can find more about these parameters and their values here and there;
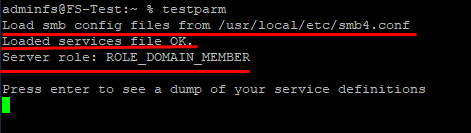
- Check the configuration file with the following command: testparm; if everything is alright, you won’t see any error notifications;
- reboot (extend your privileges and reboot the server to install the settings);
To make sure that the configuration is successful, all you have to do is introduce the server to the enterprise domain and check whether everything is working just fine:
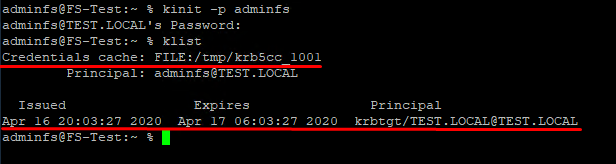
- Now, that’s important. Before continuing configuration, you should perform the clock synchronization with the NTP server. In this particular case, the NTP service is running on a domain controller. Use the ntpdate “insert your NTP Server IP” command for it. The clock synchronization is necessary for the correct connection to the AD.
- Run the kinit -p adminfs command to get a ticket from Kerberos (adminfs is a domain account with the domain admin rights), you’ll need credentials for this one;
- Check the presence of an AD certificate with the klist command;
- net ads join –U adminfs (the adminfs account must have been added to the domain on a preliminary state to have enough rights to introduce the server to the domain because you’ll need the password. If everything works fine, you’ll get this response: «Joined ‘Fs-Test’ to realm ‘Test.Local‘»);
- wbinfo –p (check the winbindd service availability);
- wbinfo -u (domain users listing);
- wbinfo –g (available domain user groups listing);
- getent group (available domain and local user groups listing);
- getent passwd (available domain and local user passwords listing).
Create and configure a file system to connect as SMB resource
Trust me; you probably want to separate your future resource from your working directories of the OS itself: it will come in handy in terms of security and mere convenience in the future. So, in order to do that, let’s build you a separate file system (FS) for your resource (by the way, you can find more details about OS disk organization here).
For now, check your files names to avoid overlap and calculate the size of your future file system for quoting:
df -kh
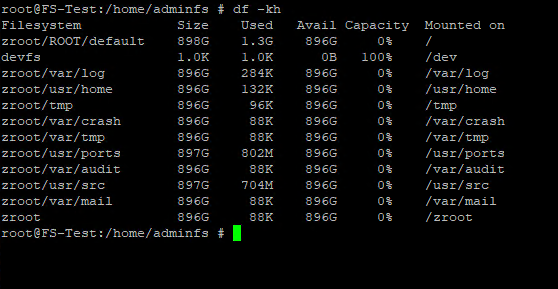
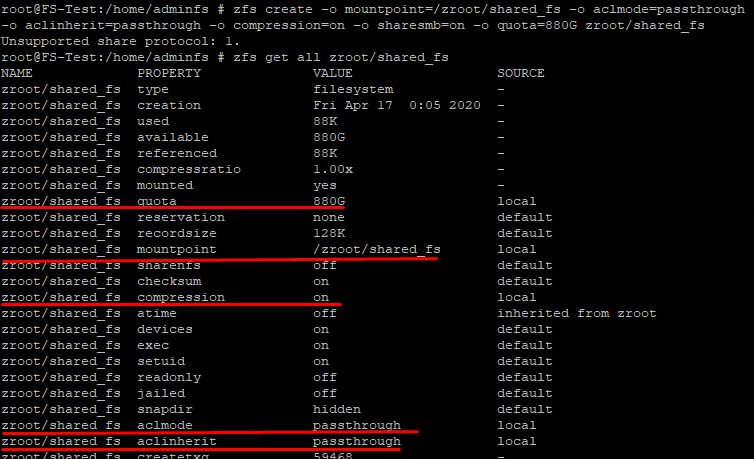
Select the appropriate size quota for your file system. Frankly, you don’t actually need to do that, but a file system can grow and consume more resources than you had in mind if left unchecked. And you surely don’t want that, do you? So, keep everything in check and leave at least 16 GB of free disk space for the OS. That way, you set an 880 GB quota for your file system. Don’t lose your time and set its parameters too: zroot/shared_fs path; /zroot/shared_fs mount point; activate direct access mode for ACL; activate inherited permissions mode; active data compression, make it available for SMB and select its quota). You do all this with one command:
|
1 |
zfs create -o mountpoint=/zroot/shared_fs -o aclmode=passthrough -o aclinherit=passthrough -o compression=on -o sharesmb=on -o quota=880G zroot/shared_fs |
You can find more info here!
See the results:
|
1 |
zfs get all zroot/shared_fs |
Change directory owner and group:
|
1 |
chown "adminfs":"domain users" /zroot/shared_fs |
Open full access to the directory and its content for the owner; in future, configure it according to the domain security policy:
|
1 |
setfacl -m owner@:full_set:fd:allow /zroot/shared_fs |
Open access to the directory for reading and editing content for the group:
|
1 |
setfacl -m group@:modify_set:fd:allow /zroot/shared_fs |
See the results:
|
1 |
getfacl /zroot/shared_fs |
Extended option:
|
1 |
getfacl -v /zroot/shared_fs |
Reboot SAMBA and all connected services:
|
1 |
service samba_server restart |
Here is more information about configuring ACL settings and their functions. With the given permissions, you’ll be able to distribute access rights to the directory for different tasks.
Well, now the installation and configuration of the file server are finished, so…
… it’s time to move to the testing!
In order to check your newly created server to see if it works just about right, enter one of the test VMs and move to your server’s IP address:\\172.16.10.91\ZFS\, then enter network credentials:
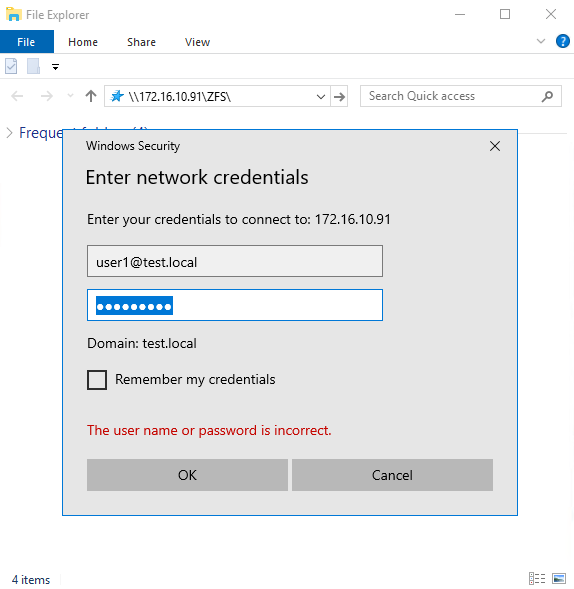
If everything is ok, you’ll connect your network resource. Now, you can move onto creating necessary directories, setting permissions, and testing your infrastructure.
To sum up
If there’s anything wrong ever in the slightest, you’ll have to go back and check everything. Then, try creating, deleting, copying, and managing access rights to files and directories in one of the testing VMs. Try the same thing with another VM using different domain user accounts. If the permissions are set right, you can forbid other users or user groups from editing content if necessary. However, that’s a whole different story. If security measures and access rights aren’t your concerns right now, everything is ready to go.
Well. That’s it! Your file server is a go. Hope I did help you to save some time and effort. Good luck!