

Having a disaster recovery site is a must for any company. That’s why I wrote an article some time ago on how to set up Site Recovery Manager (SRM) so that it allows for creating a disaster recovery site. Today, I describe how you can actually create that site and migrate your VMs from the main site there.

VMware vCenter Site Recovery Manager Topologies
First, before I move to some hands-on stuff, let’s talk about topologies supported by VMware vCenter Site Recovery Manager. SRM allows for 3 following topologies:
1. 2 sites with one vCenter Server instance per Platform Services Controller (PSC).
2. 2 sites with several vCenter Server instances per PSC
3. 1 site with several vCenter Server instances sharing one PSC
2-Site Topology with One vCenter Server Instance per PSC
For my money, it’s the smartest and the most commonly used configuration. You can use either external PSC or one embedded in a vCenter Server instance. This topology enables to create sites on different Single Sign-On (SSO) domains, be they in Enhanced Linked Mode or not. The scheme below shows in detail how the described topology is implemented.

Today, I discuss how to deploy this very configuration. Creating any other topology mentioned in this section looks pretty similar to deploying one that I describe today. Sure, there are some differences, and if you are going to deploy any of those configurations mentioned here, look through the documents VMware provides on this topic.
2-Site Topology with Multiple vCenter Server Instances per PSC
In this scenario, PSC instances are external relative to the vCenter Server ones. This configuration also allows for creating sites in different SSO domains, no matter whether they are in Enhanced Linked Mode or not. Find this topology scheme below.

Single-Site Topology with a PSC
It is possible to deploy SRM such that all its instances are connected to vCenter Server instances that share one PSC. Even though single-site configuration looks fairly simple, I strongly warn you against this scenario: your environment just won’t failover if something happens to PSC!

Deploying Site Recovery Manager in a Two-Site Configuration with Single vCenter Server Instance per PSC
Creating a Site Pair
To start with, create a Site Pair. Without a Site Pair, SRM won’t protect the site since it won’t be aware of the replication direction.
Open the Site Recovery Manager console

Click New site pair to start a Site Pair creation.

Specify site details for the vCenter Server instance that is to be replicated and PSC host name and credentials.

Select the services that you want to pair.

Next, connect the certificates that are necessary for pairing.

Verify the settings and press Finish to start pairing.

Now, let’s whether SRM was configured right and test it.

Go to the Summary menu and make sure that there were no errors during pairing.

Setting up Site Recovery Manager
Now, let’s go back to where the previous part finished, namely, to setting up SRM. Site Recovery Manager pre-configuration is a long process that includes the following steps:
- Configuring LUN replication
- Setting up vCenter Server and SRM instances connection between sites.
- Connecting SRM to Site Recovery Adapters on both sites. Testing LUN replication between sites.
- Connecting datastores, VM port groups, and ESX servers on both sites.
- Creating protection groups on the primary site. The protection group is a collection of VMs that belongs to one datastore group. It is the key component of any recovery plan. Datastore group, in its turn, is an object generated automatically based on some rules that have something to do with connections between LUNs, VMFS volumes, and VMs. To make it simpler to understand, let’s assume that if there is only one VMFS volume per LUN and VMs that share that volume do not have files on other volumes, they belong to one datastore group, which, in its turn, is associated with one protection group.
- Select datastore for placeholder VMs for protection Group, the VMFS volume on the recovery site that keeps VM metadata, i.e., *.vmsd, *.vmx, and *.vmfx files. Those files are copied to the recovery site and allow registering the VMs in vCenter on that site.
- For each VM in Protection Group, you need to specify the following parameters to migrate it successfully to the remote site.
- Datacenter
- Resource pool
- Network port group
- Metadata storage
- Customization specification (XML files that contain guest OS settings for VM, e.g., IP, administrator credentials, etc.)
- Recovery priority
- Message for an administrator that is output while replicating a VM, i.e., before and after turning on the VM.
- Scripts run before and after turning on the VM.
While working with SRM, you need certain rights that can be configured pretty easily. Here are the options which you might need to set up depending on your SRM topology:
- Check Storage Replication Adapter status. Find how to set it up in Part 1.

- Network mappings.

- Mapping directories for site replication.

- Resource mappings.

- Storage policy mappings.

- Placeholder datastores.

In this article, I won’t go into setting up each option. The options set you need to configure depends on infrastructure topology. Find more details here.
Setting up Replication Between Sites
Once you are done with configuring replication between the main and secondary sites, you can move on to setting the replication mechanism. You can choose either forward or reverse replication (I use SRM in the Forward replication mode today). To add a configuration, press New.

At the first step of the Configure Replication wizard, you need to select the VMs that you want to protect. Here, I decided to protect only one VM, VM-TEST-1.

Select the target site and vSphere Replication server that will handle the replication.

Next, select a target datastore and specify additional settings, i.e., disk format and VM storage policy.

Configure VM replication afterward (RPO, number of instances to keep, and how long each lasts).

At the next step, you should add the VM to a protection group. You can either add it to a new protection group or to the existing one. I have not created any protection groups yet (I create them later), so I just opt for Do not add to protection group now.

Verify all the settings and press Finish to initiate replica addition.

Wait until the wizard finishes and refresh the Replications tab. See, the VM is good to go!

You can also set up the reverse replication using the small guide described above. Everything looks just the same… apart from replication direction!
Creating a Protection Group
Now, go to the Protection Groups tab. As it comes from its name, there, you can create protection groups – an abstraction for replicating and restoring multiple VMs.
Create a protection group.

Enter a protection group name and select the replication direction.

Select the replication type afterward. Here, I protect individual VMs.

Select the VMs that are to be included in the protection group. I use the VM I selected while configuring replication.

I did not add the protection group to the recovery plan (I am going to create one later). Once you select this option, SRM displays a warning saying that the protection group cannot be recovered without being added to a recovery plan. Just ignore this warning since the recovery plan will be created a bit later.

Verify the settings and click Finish to initiate the recovery group creation process.

Check the status of the protection group now.

Creating a Recovery Plan
Congratulations, you’re almost there! Let’s create a recovery plan now. Start the recovery plan creation process by pressing New.

Specify the name, direction, and location for the plan.

Select the protection group and protection policy.

Select the network for testing the plan.

Review the settings and click Finish.

Check the recovery plan status.

Let’s test the plan!
Now, since everything seems fine, let’s jump to the testing of the recently created disaster recovery site.
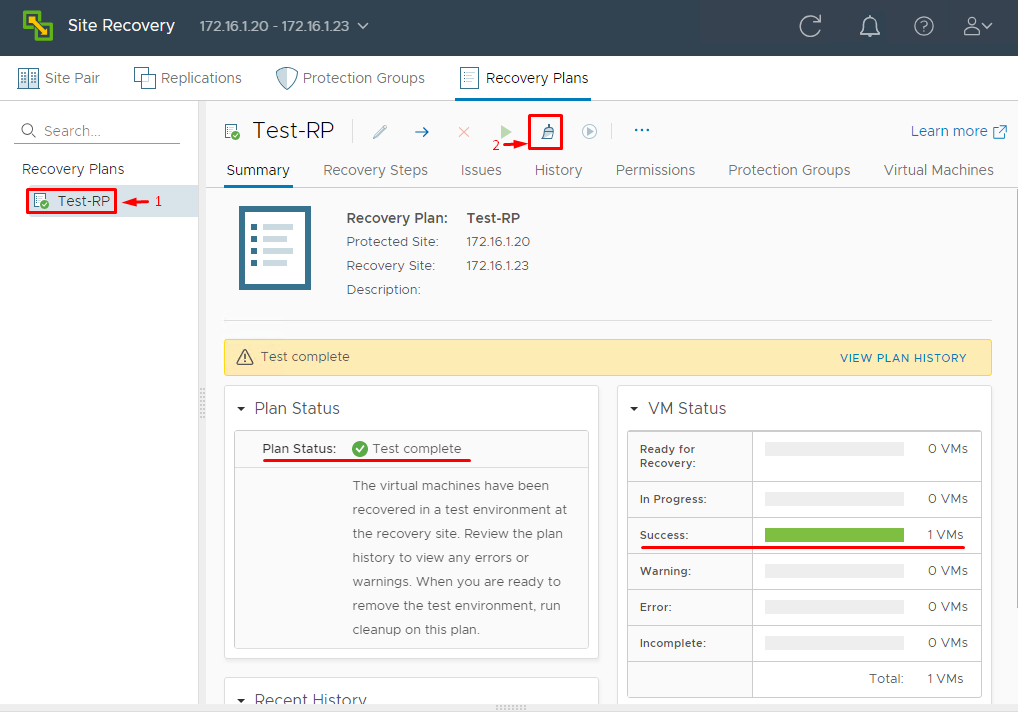
Select the recently created recovery plan, press Recovery Steps, and finally click the self-titled button to run the test.

This plan is a sequence of steps which after being passed bring you to the fully functioning replica of your environment on a recovery site. To create the test, you need to follow the steps of the wizard. First, you need to confirm whether you want the recent changes to be replicated to the recovery site.

Then, review the settings and run the test.
Provided that everything is fine, data on both sites get synced, and a VM starts on the recovery site. The VM on the main site, in its turn, is shut down. Check the plan status once the test is over. Don’t forget to run a cleanup at the end; otherwise, the infrastructure won’t just be working as it should!
Speaking of cleanup, it is a two-stage process. At the first step, you need to confirm removing the environment and resetting the plan to the Ready state.

Next, verify the settings and click Finish to start the cleanup.

That’s pretty much it! The recovery plan is set to the Ready for Recovery mode, meaning that your environment is protected.

You can also run the test migration of the environment on your main site to the disaster recovery site. I won’t discuss how it can be done in this article, but you can find the whole process here. Note that after recovering the protected environment, you need to run cleanup; otherwise, failover won’t be possible!
Conclusion
I guess that this article series was pretty long to read. Nevertheless, I believe both articles to be very important because they discuss such important thing as creating a disaster recovery site. With VMware vCenter Site Recovery Manager, that procedure is fairly simple. I hope you’ll have your environments running smoothly!
