

Introduction
If you are new to VMware or just starting out in the tech, you may feel a bit confused about products naming. Well, at least I was. There are tons of products in the suite so many have a hard time grasping how all those things come together. For instance, it may be hard for a beginner to tell apart ESXi and vSphere. What should you do? Well, nothing special, you know. Google. Ask fellow admins. Look through forums. Read books. Well, my post is not here to bring you from the very beginning to finish. It’s rather a long process, and you need to pay your dues sometimes. Honestly, I got some knowledge only through fixing things that I had messed up. This post covers some questions that popped out in my head when I was only starting. And, my case is not unique. So, let’s start with VMware!
Glossary
I wish I wrote this article at the very beginning of my blog. Things would seem rather logical if I explained things you should consider starting with VMware first and then gradually moved to some more interesting stuff. Well, whatever, what done is done. Let’s discuss some basic things at least now.
And, I want to start this article with the glossary just as any good introduction article. Here are just a few names that were troublesome for me to tell apart:
- VMware – the company name.
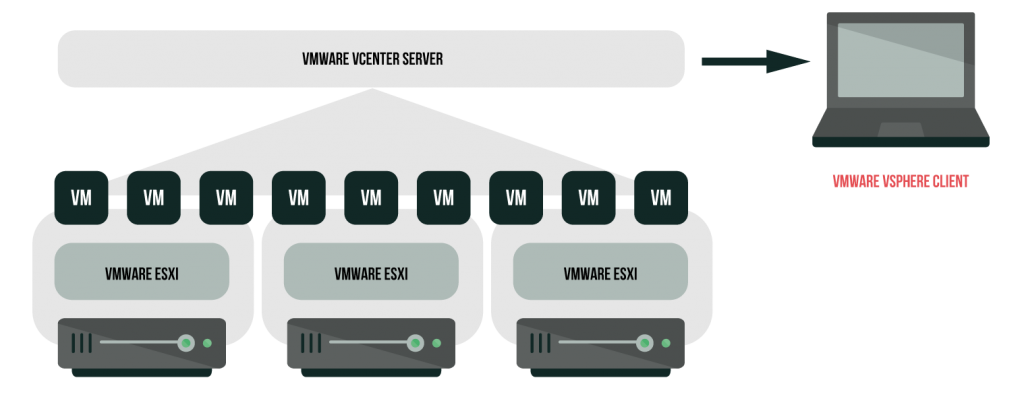
- VMware vSphere – the suite of products including VMware ESXi, VMware vCenter Server, etc. That’s similar to what you observe for Microsoft Office where you have Word, Excel, and so on provided in one suite.
- VMware ESXi – the bare-metal hypervisor that virtualizes x86 server hardware. That’s the thing allowing you to run virtual machines and install the required guest operating systems – OS inside the VMs.
- VMware vCenter Server – the product allowing you to manage your ESXi servers and VMs on those hosts.
- VMware vCenter Web Client – web interface allowing to connect to vCenter Server remotely from any browser.
- VMware vSphere Client – an interface that enables users to connect to vCenter Server or ESXi host from any Windows PC.
To facilitate you memorizing all that stuff, here’s the simple scheme of how all those things are connected in your environment.
If you have troubles with understanding any other VMware-related name, just google it! Fortunately, the company provides enough materials to answer that kind of questions.
VMware ESXi is free… but don’t expect much form it!
Exploring any solution, you should start with its licensing. Yes, you still need to look through VMware ESXi licensing even though the official documentation says the hypervisor to be free. That’s absolutely true that you don’t need to pay for the hypervisor to download it from the official website. Just complete the registration and you are good to go! But, the thing is that you won’t get most of ESXi features! You see, you can get only Evaluation version in that way. It’s kinda of a trial version with the 60-day trial period. Well, no worries, you still can get the unlimited free version. Its key is available in your account once you register at the official website.
Wait, what’s the diff between the paid and free versions? Both are based on the same source code. But, they are dramatically different though. For instance, Backup API is disabled in the free version. This means that you cannot back up the VMs using traditional means like VCB and Veeam Backup. Also, you cannot manage ESXi hosts via vCenter while running a free version. There’s also no vMotion – the feature allowing to migrate VMs between hosts without shutting them down – available in the free version either! You won’t also be able to balance loads or restart VMs automatically as RDS and High Availability features are not available. Actually, there’s a pretty long list of things that aren’t available in the free version, so you are better to pay for the proper license (Essentials, or Essentials Plus, at least) rather than struggle with the free version lacking most of the tools for VM management.
Local storage vs. shared storage. Why you should ALWAYS choose the shared one
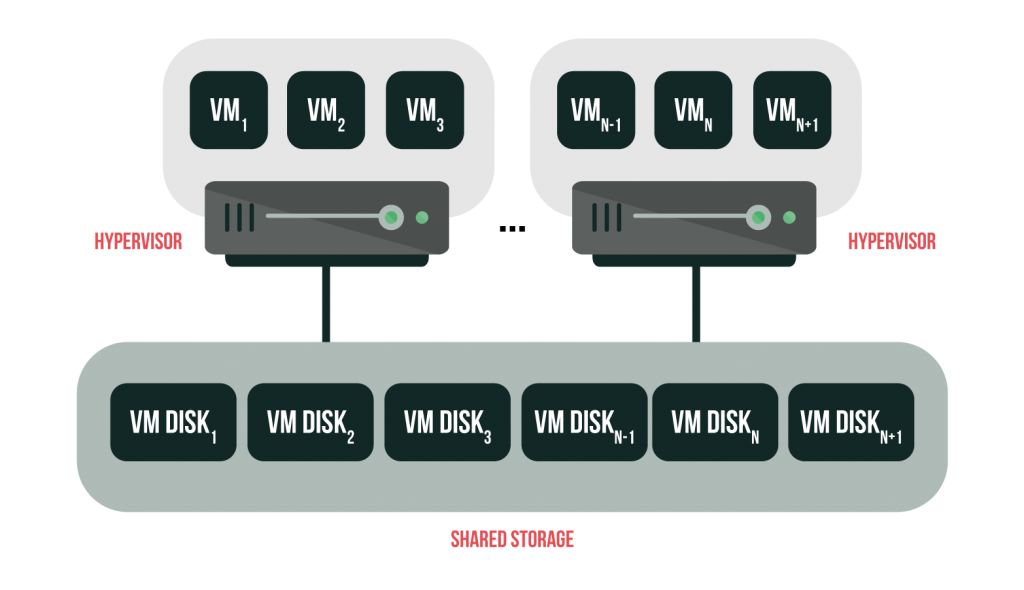
Many think that they can do a lot of cool stuff without shared storage. Hmm, what about High Availability, DRS, vMotion, and so on? You need shared storage for them, you know. Shared storage, for my money, is always better. It is reliable and once tuned properly delivers the required performance. Well, wait, we have here an article about fundamentals, right? So, I believe it’s good to talk about both types a bit anyway.
Local storage
Let’s start with the local storage – storage resource of just the same host where the hypervisor is running. It can be implemented as internal and external storage units. Internal storage units are hard disks located inside your ESXi host. External ones, in their turn, are the storage systems located outside the host that are connected directly through one of these protocols: SCSI, IDE, SATA, USB, or SAS. Local storage doesn’t require a storage network to communicate with the ESXi host. Just hook up those units with the cable to your host, and that’s it! Local storage units can be arranged into RAIDs allowing you to achieve high performance and redundancy.
Although this storage configuration is simple, it is not recommended. You see, those single connections between hosts and storage units are single points of failure. If they are interrupted, the entire thing fails. Second, storage devices do not support multiple connections. So, you cannot use multiple paths to access the storage. Third, you cannot share across multiple hosts. In this way, you won’t be able to use most of the cool VMware features like High Availability, DRS, and vMotion. That’s, actually, why I don’t like this type of storage.
Shared storage
The shared storage architecture, in its turn, is a type of storage resource that is accessed by many hosts simultaneously. It can be SAN (Storage Area Network) or NAS (Network Array Storage) boxes that allow keeping data accessible simultaneously from multiple hosts. It can also be cloud storage.
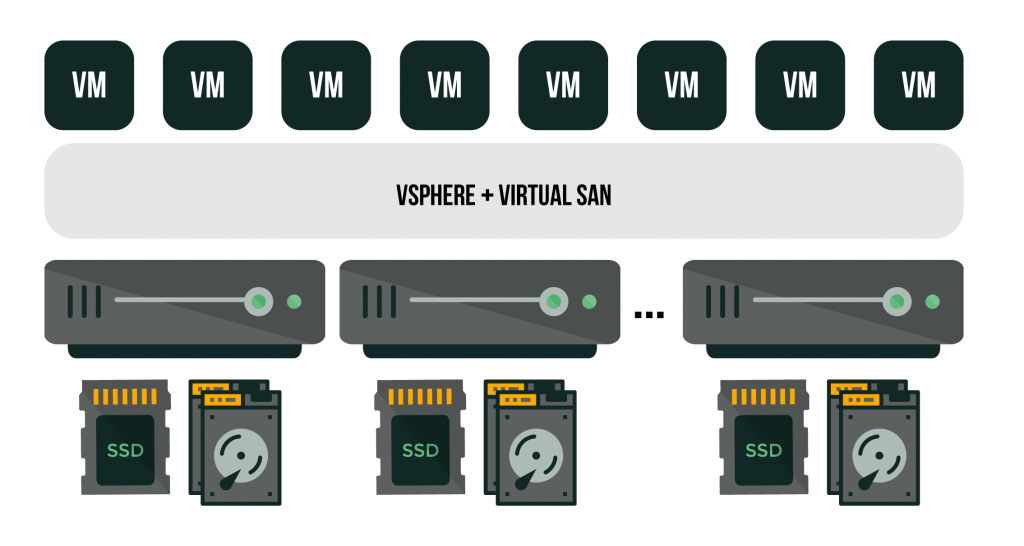
Talking about the shared storage, I’d like to mention the software-defined storage as I believe this architecture be the smartest way to build storage. It’s far more flexible than the physical shared one and also is dramatically cheaper. With VMware vSAN, building shared storage becomes even cheaper as it can be run on whatever hardware that fits its hardware compatibility list. There’re a bunch of other solutions like VMware vSAN (i.e., Microsoft S2D, StarWind Virtual SAN, StorMagic SvSAN) but we are talking here about VMware solutions, right? Here’s the scheme how vSAN works.
Thick provisioning vs. Thin provisioning. What do you expect from the virtual disk?
Provisioning type is another thing admins usually are hard to decide on. And, unlike the previous case with the storage, there’s no universal solution at all. You see, you need to understand clearly what actually you expect from the virtual disk for: high performance, security, or storage efficiency. So, to help you to figure out which provisioning type meets your needs, I’m going to look at each of them.
Thick provisioned
Thick-provisioned disks consume all the space allocated to them in the datastore right from the moment of their creation preventing anything else from using that space. Here’s a quick example. Let’s say, you have a 60 GB datastore where you allocated 30 GB for disk 1 while the rest is allocated for the disk 2. On each, you used only 10 GB. Yet, as you created two thick-provisioned devices, there will be no free space on the datastore even though you used only 20 GB!
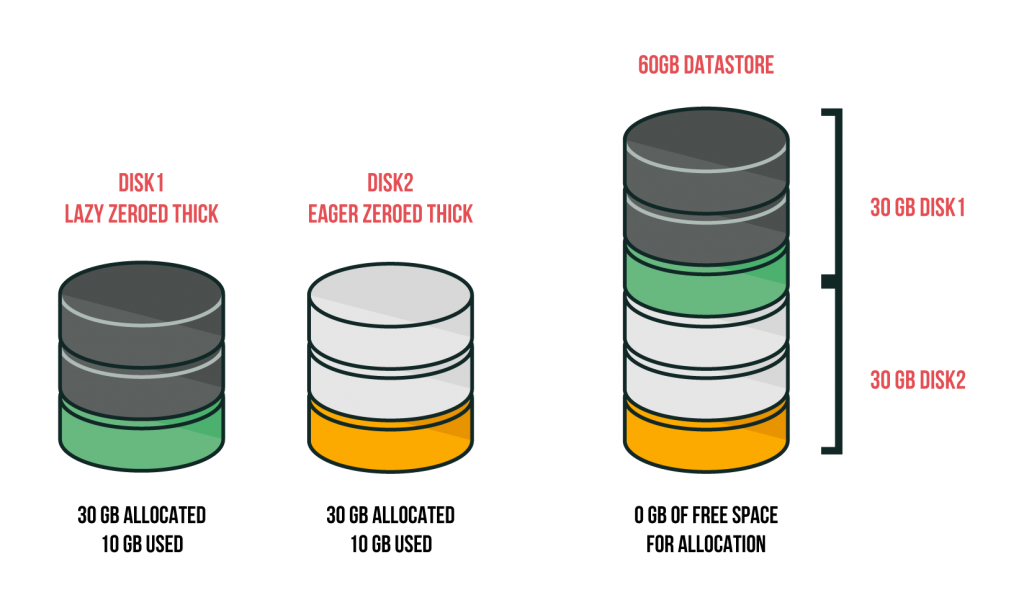
Even though you may be running out of space fairly easy, thick provisioned disks are fast to create and deliver good performance. Yet, there’s a small thing about thick provisioning itself: data are not removed from the allocated space. In this way, a VM can access old data. That’s actually why thick provisioning is not a good thing when you really care about security.
Now, as you know some about what thick provisioning is and its strong and weak sides, I’d like to discuss two thick-provisioned virtual disks sub-types: lazy-zeroed disks and eager-zeroed disks. They treat initial data differently, but they both get all of the required space right from their creation.
Lazy zeroed disks
The old data are “zeroed out” block-by-block as the new data arrive. Well, that looks a bit more secure than just thick provisioning, yet lazy-zeroed disks performance will be lower for the first writes. It takes the system a while to “zero out” the existing block and write another one.
Eager zeroed disks
Eager zeroed disks, in their turn, consume all the allocated space during their creation. Previously written data are wiped out, so it takes you longer to create such disks. On the other hand, their first writes are faster, and these disks are pretty secure. You see, when a VMDK is deleted, the blocks are just marked available until they get overwritten. For eager-zeroed virtual disks, the entire allocated space is freed from data, while in case of lazy zeroing previous data are removed block by block. That’s actually why eager zeroing is more common than lazy zeroing.
Thin provisioned disks
While being created, thin provisioned disks consume the minimal initial space and grow as they get filled by data. Let’s say, you have two 30 GB thin-provisioned disks on the 60 GB datastore. Both have only 10 GB used, so effectively, you have only 20 GB consumed, and there still should be 40 GB of free space on the datastore even though its entire space has been pre-allocated.
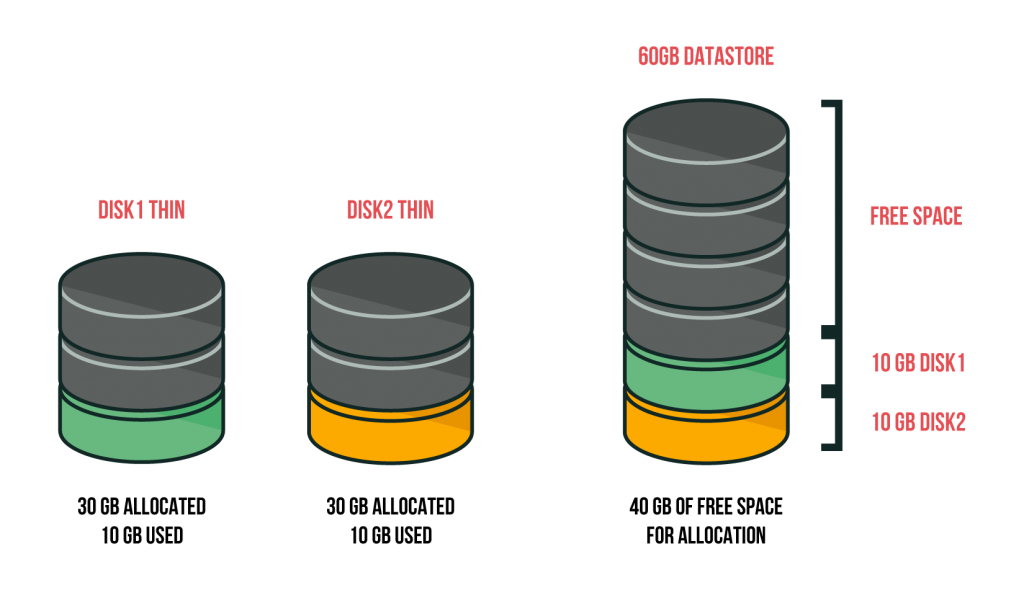
Thin-provisioned virtual disks are quick to create and are really good when it comes to saving space. Still, their performance is not good enough. You see, when you create a thin provisioned disk, operating system deletes only the indexes from the file table referring to the file body in the file system. Blocks are marked as ones belonging to the deleted files, but there’s no full deletion after all! So, when new data arrive, zeroing occurs block-by-block just as for lazy zeroed disks.
There are bunch of problems with thin provisioned disks. If you experience any of them, just google how to remediate those issues.
Snapshots vs. Backups
Many beginners believe snapshots to be the same thing as backups. Well, that’s wrong! I’ve already written a post about this fallacy so I won’t tell you much on that matter here.
But, as the myth is still alive, I believe that there’s a good point to differentiate snapshots and backups one more time. Backups are the copies of data that can be used to recover them on any device. So, you can roll back to those copies whenever you want wherever you need. Snapshots, in their turn, just keep some VM states, and they are not something you can roll back if your VM goes dies. Doing snapshots is good when you play around with VM settings and want to avoid a lot of finger work if the new configuration doesn’t work out. If you want your precious data to survive whatever bad happens, you need regular backups. In order not to screw things up, never ever rely on snapshots as a recovery point.
Logs are important. Make sure not to delete them
Logs are probably the most important thing when it comes to analyzing what’s wrong with your ESXi host or VM. Especially, you need to pay attention to the logs when you run ESXi on flash drives or SD cards. In that case, VMkernel logs reside in the scratch partition – the 512 MB fixed-size RAM disk that utilizes the part of host RAM. So, you, basically, keep all your logs in RAM! This means that VMkernel logs are wiped out every time you reboot hosts. That’s not fun at all! Fortunately, guys at VMware came with some solution for keeping the logs – vCenter syslog collector. vCenter 6 has it already included.
Always check the networking
Virtualization delivers a wide range of network tuning abilities. And, to ensure that your infrastructure performance is not bottlenecked with the networking you need to create a roadmap. Separate networks for VMs and figure out which trunk ports and vLANs you need to set up. By thinking carefully through your environment, you can avoid numerous common mistakes related to NICs and virtual interfaces utilization. All that mess leads one day to unpredictable time loss during host migration as there was no clear understanding of each network purposes. So, come up with the road map, save yourself the hassle.
Also, it’s smart to keep everything as it is on the roadmap. Everything besides IPs and hosts names should be identical. Don’t change port groups names, don’t swap the NICs. Don’t mess things up. Ultimately, you’ll get used to the environment, and once a host goes down, you’ll use ESXi features effectively to remediate the issues.
Network adapters to choose
Eventually, let’s talk about NICs – network adapters. You cannot use whatever adapter you want for the VMs. Everything depends on the guest OS and its version. In this way, you need to know how to pick up the right NIC while creating a VM. There’s, actually, a good article by VMware on this issue. So, if you want to dive deeper, just look through that article. Here, I talk only about three the most common network adapter options.
- VMXNET 3 – These network adapters are tailored for high performance. VMXNET 3 inherited all VMXNET 2 features like jumbo frames and hardware offloads and added some new ones (i.e., multiqueue support, IPv6 offloads, and MSI/MSI-X interrupt delivery) These NICs are supported by virtual machines version 7 and later with Windows 7 and later as the guest OS.
- Vlance is an emulated vNIC version of the AMD 79C970 PCnet32- LANCE NIC. It is included almost in all 32-bit guest OS except Windows Vista and the later Windows versions. VMs configured with this adapter use their networks immediately.
- E1000 is an emulated vNIC version of Intel 82545EM Gigabit Ethernet NIC. It is typical for Linux versions 2.4.19 and later, Windows Server 2003 (32-bit) and later, and Windows XP Professional x64 edition.
Conclusion
Today, I discussed some things you need to consider while starting with VMware environments. Everything I wrote here reflects my viewpoint and nothing more than that. Still, I just share here my experience, remember? Well, I hope this scribbling will be useful for you anyway. Good luck with VMware!
