

Introduction
Some time ago, I published articles on setting up a home lab using a PC running ESXi and Workstation. We all know that nested virtualization is not an ESXi-only feature; Microsoft Hyper-V also enables us to run VMs inside its VMs. Microsoft’s implementation of this technology is a bit different, but it exists. And, considering that VMware and Microsoft have been competing for a long time, it’s interesting to see what each has to offer for this type of virtualization. In this post, I examine how easy it is to configure a nested virtualization layer inside Hyper-V and vSphere VMs and discuss peculiarities of this process in both environments.
Recap on nested virtualization
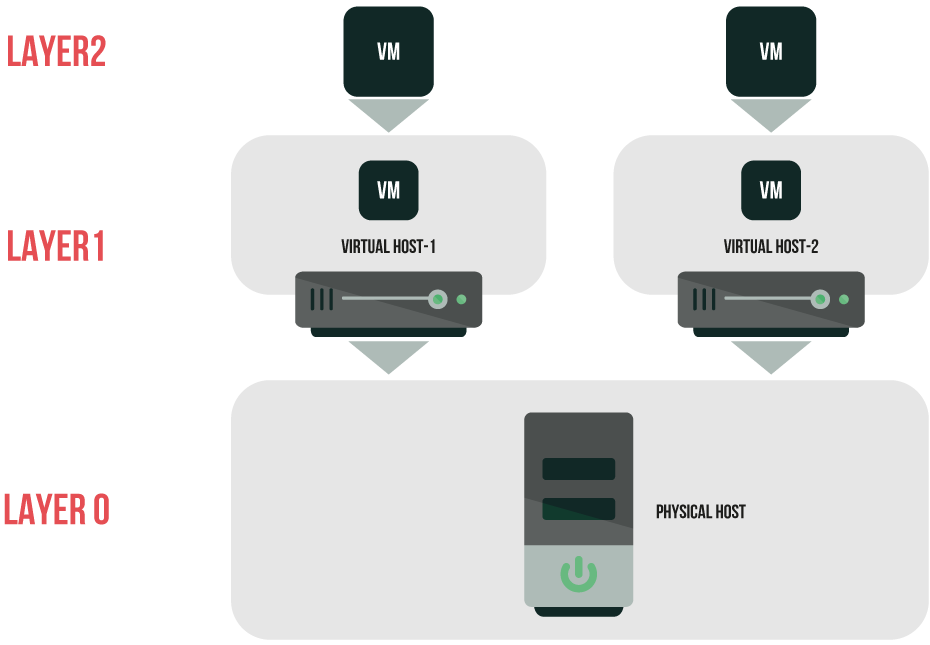
Nested virtualization is a relatively new technology which lets you create virtualized platforms inside VMs which themselves run on a hypervisor. Nested virtualization is a goldmine for homelabbers as it enables them to build virtualized platforms for home labs and small test environments that are limited on hardware.
Hypervisor types
There are two types of hypervisors. Hypervisors of the first type – “bare-metal” or embedded hypervisors – run directly on the hardware; there’s no operating system (OS) between them and hardware. Such a design allows for high reliability and security without compromising performance. Hypervisors of the second type – hosted hypervisors – need a host OS to provide virtualization services. To put it simple, the VMs won’t be running except on the user space of the host OS.
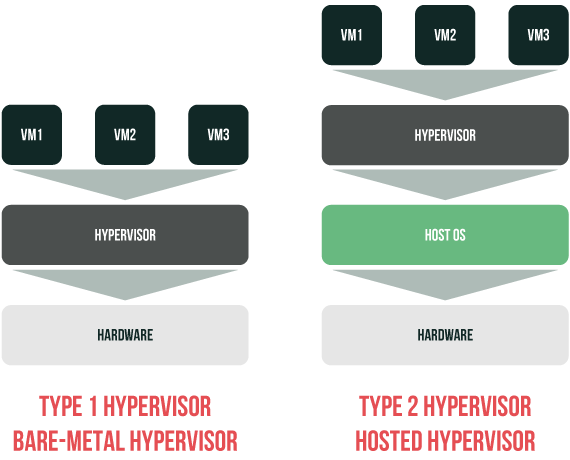
Performance-wise, “bare-metal” hypervisors have the upper hand since they work directly on hardware and don’t waste its resources on maintaining VMs. Such a vast disadvantage has almost led hosted hypervisors to extinction.
Hyper-V and ESXi are “bare-metal” hypervisors. Nested virtualization is just one of the multiple technologies they both support on similar premises, which makes the comparison more than appropriate.
Hypervisor system requirements
| Component | ESXi 6.7 | Hyper-V on Windows Server 2016 |
|---|---|---|
| CPU | At least two CPU cores 64-bit x86 processors. | A 64-bit processor with second-level address translation (SLAT). |
| RAM | Requires a minimum of 4 GB of physical RAM (better 8 GB). | Requires a minimum of 4 GB of physical RAM (better 8 GB) |
| Virtualization support turned on in the BIOS or UEFI | Hardware-assisted virtualization. To support 64-bit virtual machines, support for hardware virtualization (Intel VT-x or AMD RVI). | Hardware-assisted virtualization. To support 64-bit virtual machines, support for hardware virtualization (Intel VT-x or AMD RVI) |
| Requires the NX/XD bit to be enabled for the CPU in the BIOS. | Hardware-enforced Data Execution Prevention (DEP) must be available and enabled. For Intel systems, this is the XD bit (execute disable bit). For AMD systems, this is the NX bit (no execute bit). | |
| LAN | One or more Gigabit or faster Ethernet controllers. For a list of supported network adapter models. | – |
| Disk controllers | SCSI disk or a local, non-network, RAID LUN with unpartitioned space for the virtual machines. | – |
| For Serial ATA (SATA), a disk connected through supported SAS controllers or supported on-board SATA controllers. SATA disks are considered remote, not local. These disks are not used as a scratch partition by default because they are seen as remote. | – |
Please keep in mind that you can’t configure nested virtualization without meeting requirements from this table.
Now, let’s talk about software requirements. Nested virtualization in ESXi software requirements:
- You must run a VM on hardware version 9 and higher.
Nested virtualization in Hyper-V software requirements:
- The same version of Windows must be installed on the bare-metal host and VMs where you plan to enable nested virtualization.
- You must run a VM configuration version 8.0. and higher.
- Dynamic memory allocation is not supported.
- Dynamic migration is not supported.
- Save/Restore for VMs is not supported.
Host VM configuration to enable nested virtualization
In both hypervisors, you cannot build a second virtualization layer without configuring a VM acting as a host appropriately.
ESXi
On ESXi, you can install the hypervisor on VM before you actually fine-tune it, but you won’t be able to power on the Layer 2 VMs. Here’s the warning saying that.

Here’s what you’ll see in vCenter if prompted to start the VM.
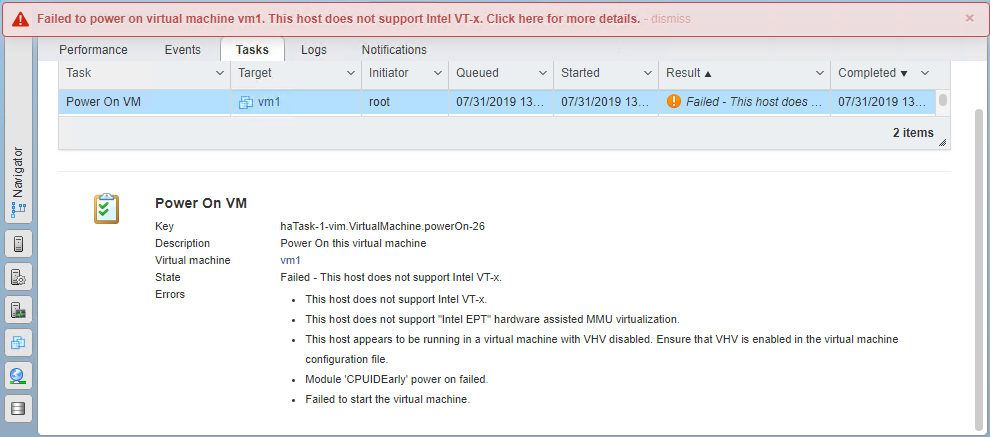
To avoid this issue, configure the Layer 1 VM before deploying ESXi.
Hyper-V
On Hyper-V, before you proceed with installing a VM for nested virtualization, you must also do some VM configuration (i.e., enable the VM to use CPU resources for virtualization). Otherwise, installing the Hyper-V will fail.

Before we get on with configuring VMs, there are few things you need to know. To set up nested virtualization on Windows Server, you need PowerShell; on ESXi, you can enable nested virtualization using both PowerCLI and the graphical user interface (GUI). Since nested virtualization is not a supported scenario for Hyper-V, unfortunately, you can’t enable it using GUI. Now, let’s move on through it step-by-step!
Configuring ESXi VM via PowerCLI
You need an ESXi host and a computer connected to it through an external network switch. direct network connection with Windows also works to you run the script. Create the Layer 1 VM first; ESXi can be installed after the host VM configuration. Use the following PowerCLI commands in PowerShell one by one.
1.Connect to the ESXi host wherein the VM with the virtualized ESXi is installed.
|
1 |
Connect-VIServer -Server '<ESXi Host Name or IP >' -ErrorAction Stop |
2.Check the VM state and stop it (if needed) for configuring VM settings.
|
1 |
Stop-VM -Confirm:$false -vm '<VM Name>' |
3.Enable Expose hardware assisted virtualization to the guest OS.
|
1 2 3 4 5 6 7 |
$VM = Get-VM -Name '<VM Name>' $Spec = New-Object VMware.Vim.VirtualMachineConfigSpec $Spec.nestedHVEnabled = $true $VM.ExtensionData.ReconfigVM($Spec) |
4.Enable security policies for virtual switches on this very host.
|
1 |
Get-VirtualSwitch -Server $ESXi | Get-SecurityPolicy -Verbose: $false | Set-SecurityPolicy -AllowPromiscuous $true | Set-SecurityPolicy -ForgedTransmits $true |
5.Start the VM to install ESXi. It is already ready to host the hypervisor.
|
1 |
Start-VM -Confirm:$false -vm '<VM Name>' |
6.End session with the host wherein the VM with nested ESXi is running.
|
1 |
DisConnect-VIServer -Confirm:$false -Server '<ESXi Host Name or IP >' |
Here’s the script allowing to automate Layer 1 VM deployment. The Nested-ESXi.ps1 script carries all necessary settings to prepare the VM for hosting nested virtualization. The script does the minimal error check and returns outputs of several commands. You can develop your own script using one provided below. It was tested on ESXi 6.7 Update 1 with PowerShell 5.1 and PowerCLI 11.0.
Nested-ESXi.ps1 listing:
|
1 2 3 4 5 6 7 8 9 10 11 12 13 14 15 16 17 18 19 20 21 22 23 24 25 26 27 28 29 30 31 32 33 34 35 36 37 38 39 40 41 42 43 44 45 46 47 48 49 50 51 52 53 54 55 56 57 58 59 60 61 62 63 64 65 66 67 68 69 70 71 72 73 74 75 76 77 78 79 80 81 82 83 84 85 86 87 88 89 90 91 92 93 94 95 96 97 98 99 100 101 102 103 104 105 106 107 108 109 110 111 112 113 114 115 116 117 |
<# .SYNOPSIS Setting up a nested ESXi host .PARAMETER -$ESXi ESXi Host Name or IP ('<ESXi Host Name or IP>') .PARAMETER -VMName VM name ('<VM name >') .EXAMPLE PS> .\Nested-ESXi.ps1 -ESXi '10.0.0.2' -VMName 'ESXi-HOST-1' #> # Specify ESXi host IP and VM name using the variables. param ( [Parameter (Mandatory = $true)] [String] $ESXi, [Parameter (Mandatory = $true)] [String] $VMName ) # Connect to the ESXi host. Connect-VIServer -Server $ESXi -ErrorAction Stop| Out-null # Specify nested VM name. $VM = Get-VM -Name $VMName # Variable initialization. $Errors = $null # Check the state of the nested VM and power it off if needed. if((get-vm -name $VM).PowerState -eq "PoweredOn" -or (get-vm -name $VM).Guest.State -eq "Running") { # Power off the VM. Stop-VM -Confirm:$false -vm $VM -ErrorVariable Errors | Out-Null # Error check. if ("$Errors" -eq "$null") { # State output. Write-Host "The VM ($VMName) is Shutting down. Please wait" } else { # Disconnect from the ESXi host. DisConnect-VIServer -Confirm:$false -Server $ESXi # Clear variables. Remove-Variable -Name * -Force -ErrorAction SilentlyContinue # Exit script. exit } } # Set the VM configuration value. $Spec = New-Object VMware.Vim.VirtualMachineConfigSpec -ErrorVariable Errors # Enable the "Hardware virtualization" option. $Spec.nestedHVEnabled = $true # Apply changes for VM. $VM.ExtensionData.ReconfigVM($Spec) # Error check. if ("$Errors" -eq "$null") { # State output. Write-Host "Hardware virtualization option is On." } else { # Disconnect from the ESXi host. DisConnect-VIServer -Confirm:$false -Server $ESXi # Clear variables. Remove-Variable -Name * -Force -ErrorAction SilentlyContinue # Exit script. exit } # Allow Promiscuous mode, and enable Forged Transmits on all virtual switches on ESXi host. Get-VirtualSwitch -Server $ESXi -ErrorVariable Errors | Get-SecurityPolicy -Verbose: $false -ErrorVariable Errors| Set-SecurityPolicy -AllowPromiscuous $true -ErrorVariable Errors| Set-SecurityPolicy -ForgedTransmits $true -ErrorVariable Errors| Out-Null # Error check. if ("$Errors" -eq "$null") { # State output. Write-Host "Network security policies applied." } else { # Disconnect from the ESXi host. DisConnect-VIServer -Confirm:$false -Server $ESXi # Clear variables. Remove-Variable -Name * -Force -ErrorAction SilentlyContinue # Exit script. exit } # Start the nested VM. Start-VM -Confirm:$false -vm $VM -ErrorVariable Errors| Out-Null # Error check. if ("$Errors" -eq "$null") { # State output. Write-Host "The script has completed!" } # Disconnect from the ESXi host. DisConnect-VIServer -Confirm:$false -Server $ESXi # Clear variables. Remove-Variable -Name * -Force -ErrorAction SilentlyContinue | Out-Null |

Next, enter the credential of an account through which you will connect to the host for configuring the virtualized VM on it. The account must be in the local ESXi host administrator group.

If all settings were applied, you’d get the output saying that hardware virtualization has been enabled. Otherwise, the script returns warnings saying what’s wrong.

All the work is done! Now you have only to install ESXi on this VM (unless you did it before) and configure the network between hosts.
Configuring ESXi VM via Web-GUI
You can perform pre-configuration via Web-GUI. You need a host where ESXi is installed, and a computer connected to it through an external network switch. Alternatively, use a direct network connection with Windows to launch a browser and connect to the ESXi host. To get started, you need to connect to the ESXi host via vSphere Web Client and make sure that virtualized VM is powered off (stop VM if it is running).
Enable virtualization.

Configure security policies for the virtual switch.

Now you have only to install ESXi on this VM (if it hasn’t been done earlier) and configure the network between hosts, just as in the previous scenario.
To have such a setup running smoothly, VM that hosts nested virtualization must comply with the said hypervisor system requirements (i.e., number of vCPUs and amount of RAM).
Configuring Hyper-V VM via PowerShell
To enable nested virtualization on a Hyper-V VM, you need a Windows Server 2016 host. The script in this scenario is run locally. Before any configuration, create the VM itself, install Windows Server 2016 on it, and connect that instance to the virtual switch. Here’s a quick guide on how to do that.
1. Specify the credential to start a PowerShell session between the VM that hosts nested virtualization and the Hyper-V host wherein that VM is located. Note that the account must be in the VM local administrator group!
|
1 2 3 4 5 6 7 |
$Cred = (Get-Credential -Credential $null) $UserName = $Cred.UserName $Password = $Cred.Password $Credential = New-Object System.Management.Automation.PSCredential -ArgumentList ($UserName,$Password) |
2.Stop the VM to change its settings.
|
1 |
Stop-VM '<VM name >' -Confirm:$false |
3.Enable the ExposeVirtualizationExtensions option for the VM.
|
1 |
Set-VMProcessor -VMName '<VM name >' -ExposeVirtualizationExtensions $true |
4.Turn on Mac Address Spoofing for vNIC.
|
1 |
Get-VMNetworkAdapter -VMName '<VM name >' | Set-VMNetworkAdapter -MacAddressSpoofing On |
5.Disable Dynamic Memory for VM.
|
1 |
Set-VMMemory -VMName '<VM name >' -DynamicMemoryEnabled $false |
6.Turn off the VM.
|
1 |
Start-VM '<VM name >' -Confirm:$false |
7.Start the PowerShell session in the VM with the previously specified credential. Installing Hyper-V inside of that VM, and reload it.
|
1 |
Invoke-Command -VMName '<VM name >' -Credential $Credential -ScriptBlock { Install-WindowsFeature -Name Hyper-V -IncludeAllSubFeature -IncludeManagementTools -Restart |
To automate Layer 1 VM deployment, you can use my Nested-Hyper-V.ps1 script. It carries all necessary settings to prepare that VM for hosting nested virtualization. The script does the minimal error check and returns outputs of several commands. This script was tested on Windows Server 2016 with PowerShell 5.1.
Nested-Hyper-V.ps1 turned out to be more complicated than its counterpart for ESXi for several reasons. Nested-Hyper-V.ps1 is tailored to provide you with a short go-to guide, and, as it has been already mentioned, nested virtualization is not supported by default on Hyper-V, so it needs to be enabled manually.
Nested-Hyper-V.ps1
|
1 2 3 4 5 6 7 8 9 10 11 12 13 14 15 16 17 18 19 20 21 22 23 24 25 26 27 28 29 30 31 32 33 34 35 36 37 38 39 40 41 42 43 44 45 46 47 48 49 50 51 52 53 54 55 56 57 58 59 60 61 62 63 64 65 66 67 68 69 70 71 72 73 74 75 76 77 78 79 80 81 82 83 84 85 86 87 88 89 90 91 92 93 94 95 96 97 98 99 100 101 102 103 104 105 106 107 108 109 110 111 112 113 114 115 116 117 118 119 120 121 122 123 124 125 126 127 128 129 130 131 132 133 134 135 136 137 138 139 140 141 142 143 144 145 146 147 148 149 150 151 152 153 154 155 156 157 158 159 160 161 162 163 164 165 166 167 168 169 170 171 172 173 174 175 176 177 178 179 180 181 182 183 184 185 186 187 188 189 190 191 192 193 194 195 196 197 198 199 200 201 202 203 204 205 206 207 208 209 210 211 212 213 214 215 216 217 218 219 220 |
<# .SYNOPSIS Setting up a nested Hyper-V VM .PARAMETER -VMName VM Name ('<VM Name>') .EXAMPLE PS> .\Nested-Hyper-V.ps1 -VMName 'HYPER-V-HOST-L1' #> # Specify Hyper-V VM name using the variables. param ( [Parameter (Mandatory = $true)] [String]$VMName ) # Variable initialization. $Cred = (Get-Credential -Credential $null) # Variable initialization. $UserName = $Cred.UserName # Variable initialization. $Password = $Cred.Password # Variable initialization. $Credential = New-Object System.Management.Automation.PSCredential -ArgumentList ($UserName,$Password) # Power off the VM if needed. if((Get-VM -name $VMName).State -eq "Running") { # Power off the VM if needed. Stop-VM $VMName -Confirm:$false -ErrorVariable Errors | Out-Null # Error check. if ("$Errors" -eq "$null") { # State output. Write-Host "The VM ($VMName) is Shutting down. Please wait." } else { # State output. Write-Warning "Unable to complete VM setup!" # Clear variables. Remove-Variable -Name * -Force -ErrorAction SilentlyContinue # Exit script. exit } } # Allow nested virtualization. Set-VMProcessor -VMName $VMName -ExposeVirtualizationExtensions $true -ErrorVariable Errors # Error check. if ("$Errors" -eq "$null") { # Check whether nested virtualization is enabled. $EVE = (Get-VMProcessor -VMName $VMName -ErrorVariable Errors).ExposeVirtualizationExtensions # Error "Expose Virtualization Extensions" state. if ("$EVE" -eq "$true") { # State output. Write-Host "Expose Virtualization Extensions is On." } else { # State output. Write-Warning 'Failed to enable option "Expose Virtualization Extensions"!' } } else { # State output. Write-Warning "Unable to complete VM setup!" # Clear variables. Remove-Variable -Name * -Force -ErrorAction SilentlyContinue # Exit script. exit } # Enable Mac Address Spoofing in virtual NIC settings. Get-VMNetworkAdapter -VMName $VMName -ErrorVariable Errors -OutVariable Output | Set-VMNetworkAdapter -MacAddressSpoofing On -ErrorVariable Errors # Error check. if ("$Errors" -eq "$null" -and "$Output" -ne "$null") { # State output. Write-Host "MAC address spoofing is On." } else { # State output. Write-Warning "MAC address spoofing is off, or the VM ($VMName) does not have a network adapter! Unable to complete VM setup!" # Clear variables. Remove-Variable -Name * -Force -ErrorAction SilentlyContinue # Exit script. exit } # Disable the "Dynamic Memory" option. Set-VMMemory -VMName $VMName -DynamicMemoryEnabled $false -ErrorVariable Errors # Error check. if ("$Errors" -eq "$null") { # Check whether Dynamic Memory is enabled. $DME = (Get-VMMemory -VMName $VMName -ErrorVariable Errors).DynamicMemoryEnabled # Check for "Dynamic Memory" state error. if ("$DME" -eq "$false") { # State output. Write-Host "Dynamic Memory is Off." } else { # State output. Write-Warning 'Failed to disable option "Dynamic Memory"!' } } else { # State output. Write-Warning "Unable to complete VM setup!" # Clear variables. Remove-Variable -Name * -Force -ErrorAction SilentlyContinue # Exit script. exit } # Get the VM state. if((get-vm -name $VMName -ErrorVariable Errors).State -eq "Off") { # Power On the VM. Start-VM $VMName -Confirm:$false -ErrorVariable Errors # Error check. if ("$Errors" -eq "$null") { # State output. Write-Host "The VM ($VMName) is loading. Please wait." # Wait until the VM is started. Wait-VM -vmname $VMName -For Heartbeat -Delay 120 } else { # State output. Write-Warning "Unable to complete VM setup!" # Clear variables. Remove-Variable -Name * -Force -ErrorAction SilentlyContinue # Exit script. exit } } # Running PowerShell commands on VM. Invoke-Command -VMName $VMName -Credential $Credential -ScriptBlock { # Install the Hyper-V feature along with all the necessary components. Install-WindowsFeature -Name Hyper-V -IncludeAllSubFeature -IncludeManagementTools -Restart -WarningAction SilentlyContinue -ErrorVariable Errors # Return variable value. return ($Errors) } -OutVariable OutVar | Out-Null # Variable assignment. $Errors=($OutVar)[1] # Variable assignment. $Success=($OutVar).Success # Variable assignment. $RestartNeeded=($OutVar).RestartNeeded # Error check. if ("$Errors" -eq "$null" -and $Success -eq "$true") { # Check for VM restart if ("$RestartNeeded" -eq "Yes") { # State output. Write-Host "VM is rebooting. Please wait." # Wait until the VM restart. Wait-VM -vmname $VMName -For Reboot -Delay 120 # State output. Write-Host "Hyper-v service and components installed. The script has completed!" } else { # State output. Write-Host "Hyper-v service and components are already installed in VM ($VMName). The script has completed!" } } else { # State output. Write-Warning "Hyper-v service and components not installed! Unable to complete VM setup!" # Clear variables. Remove-Variable -Name * -Force -ErrorAction SilentlyContinue # Exit script. exit } # Clear variables. Remove-Variable -Name * -Force -ErrorAction SilentlyContinue |
To let the script work correctly, save it as a local file Nested-Hyper-V.ps1 and run it using PowerShell as administrator. Here’s the cmdlet to run the script:
|
1 |
.\Nested-Hyper-V.ps1 -VMName '<VM name >' |

Specify the credential to connect to a PowerShell session on the VM. The account should be entered as <OS Host Name>\<User Name>. The account must be in a local administrator group of the VM.

If all settings were applied, the script would finish its work. Otherwise, it returns the errors.

Voila! Nested Hyper-V is ready for work!
Configuring Hyper-V VM via GUI
You need a host with preinstalled Windows Server 2016. Configuration will take place on the host locally and inside the Layer 1 VM. As in the case with ESXi, the same actions can be performed via GUI, but, as you already know, that can’t be entirely done with GUI.
Start a PowerShell session on the Hyper-V host. Make sure that virtualized VM is powered off.
Enable virtualization of your VM in PowerShell. Deploy these two commands as administrator:
1. Enable vCPU virtualization.
|
1 |
Set-VMProcessor -VMName '<VM name>' -ExposeVirtualizationExtensions $true |
2.Check whether vCPU of your VM is exposed to virtualization.
|
1 |
(Get-VMProcessor -VMName '<VM name>').ExposeVirtualizationExtensions |

Now, go to the Hyper-V Manager console, choose the required VM, and enable Mac Address Spoofing in network adapter features.

Disable Dynamic Memory in Memory features (if enabled).

Power on the VM and log in to it through the VM console in Hyper-V Manager. Start Add Roles and Features Wizard in Server Manager console, and install Hyper-V role.

Restart the VM; it is configured and good to go!
Support of the cross-platform and multi-layer nested virtualization
So, let us take a good look at both of these hypervisors in terms of cross-platform nested virtualization. ESXi supports cross-platform nested virtualization of Hyper-V host. Hyper-V, in turn, does not officially support cross-platform nested virtualization of ESXi host. Any efforts to configure it without additional settings end with PSOD. Even though there are some guides on the Internet with thorough advice on how to avoid such unfortunate finale, there is very little I can say without trying about their usefulness.
How many virtualization layers you can build on a bare-metal with ESXi 6.7 Update 1 or Hyper-V (Windows Server 2016)? A little bit earlier, in a series of articles about the virtualized home lab, I discussed how to build a two-layer virtualization environment on an ESXi host; one level of nested virtualization was built on a bare-metal host. Can one go beyond 2 layers? Official results are absent, but my experience with this technology proves that two levels of nested virtualization on both ESXi and Hyper-V (Windows Server 2016) can be created without affecting the performance of the top-level VMs. Naturally, building such an environment is possible only if CPU and RAM are powerful enough.

Nested virtualization technology use cases
As I’ve always said, nested virtualization is useful for creating a test bench based on an ESXi or Hyper-V host when you are short on hardware. Nothing more than that. Period. Note that such scenarios are hardly applicable to the working infrastructures. In actual working IT environments, this technology will be useless and even potentially dangerous as environments built on nested virtualization are not supported. That being said, as the official information goes, there is actually one example of the officially supported use of nested virtualization for ESXi – Virtual SAN Witness Appliance. It is literally a VM that itself carries hypervisor.
On the other hand, Microsoft says that there are numerous use cases for this technology. You allegedly can virtualize Visual Studio phone emulator in a VM or go testing scripts in conditions of hardware shortage (say, the presence of one or more virtual hosts on a server). While it sounds promising, I can note from my own experience that these use cases end up with installing up to two levels of nested hypervisors on one physical server and conducting entirely unreliable tests on them. The only good use case is testing fault tolerance; e.g., ESXi hosts installed on top of vSAN (also based on virtual hosts).
Conclusion
After taking a careful look at nested virtualization, I can tell that the rivalry between Microsoft and VMware on the field of this technology goes with the same results as the Cold War. Their approaches differ only in configuration details, and if there are any other significant differences in performance or usability, I haven’t noticed them.
